Casting Silver 999 by 3D-printing sacrificial patterns made with Liqcreate Wax Castable resin.
Professional caster Mr. Dombrun documented the workflow for casting silver 999 with the use of 3D-printed wax patterns for lost wax casting with Liqcreate Wax Castable resin. Previously Mr. Dombrun documented various quick burn-out cycles for their bronze and brass resin 3D-printing and casting process by using Liqcreate Wax Castable resin. Mr. Dombrun tells his story: “I have been using Liqcreate Wax Castable resin for a few years, which turns out to be of excellent quality and very pleasant to work with. It is important to follow the process workflow otherwise result can vary depending the temperature, the quality of the FEP film, the position of the part and the supports. When you get it right, the final part always has the same high quality. A book is being written for 2025, focussed on lost wax casting techniques with 3D printing, jewelry making, engraving, foundry, and more. Intended for fellow casters who are looking for answers in this activity. Although already quite complete, I will only talk about the Liqcreate project in this article. I hope to answer some of your questions concerning the use of Liqcreate Wax Castable 3D-printing resin with casting of silver 999 in this article.”
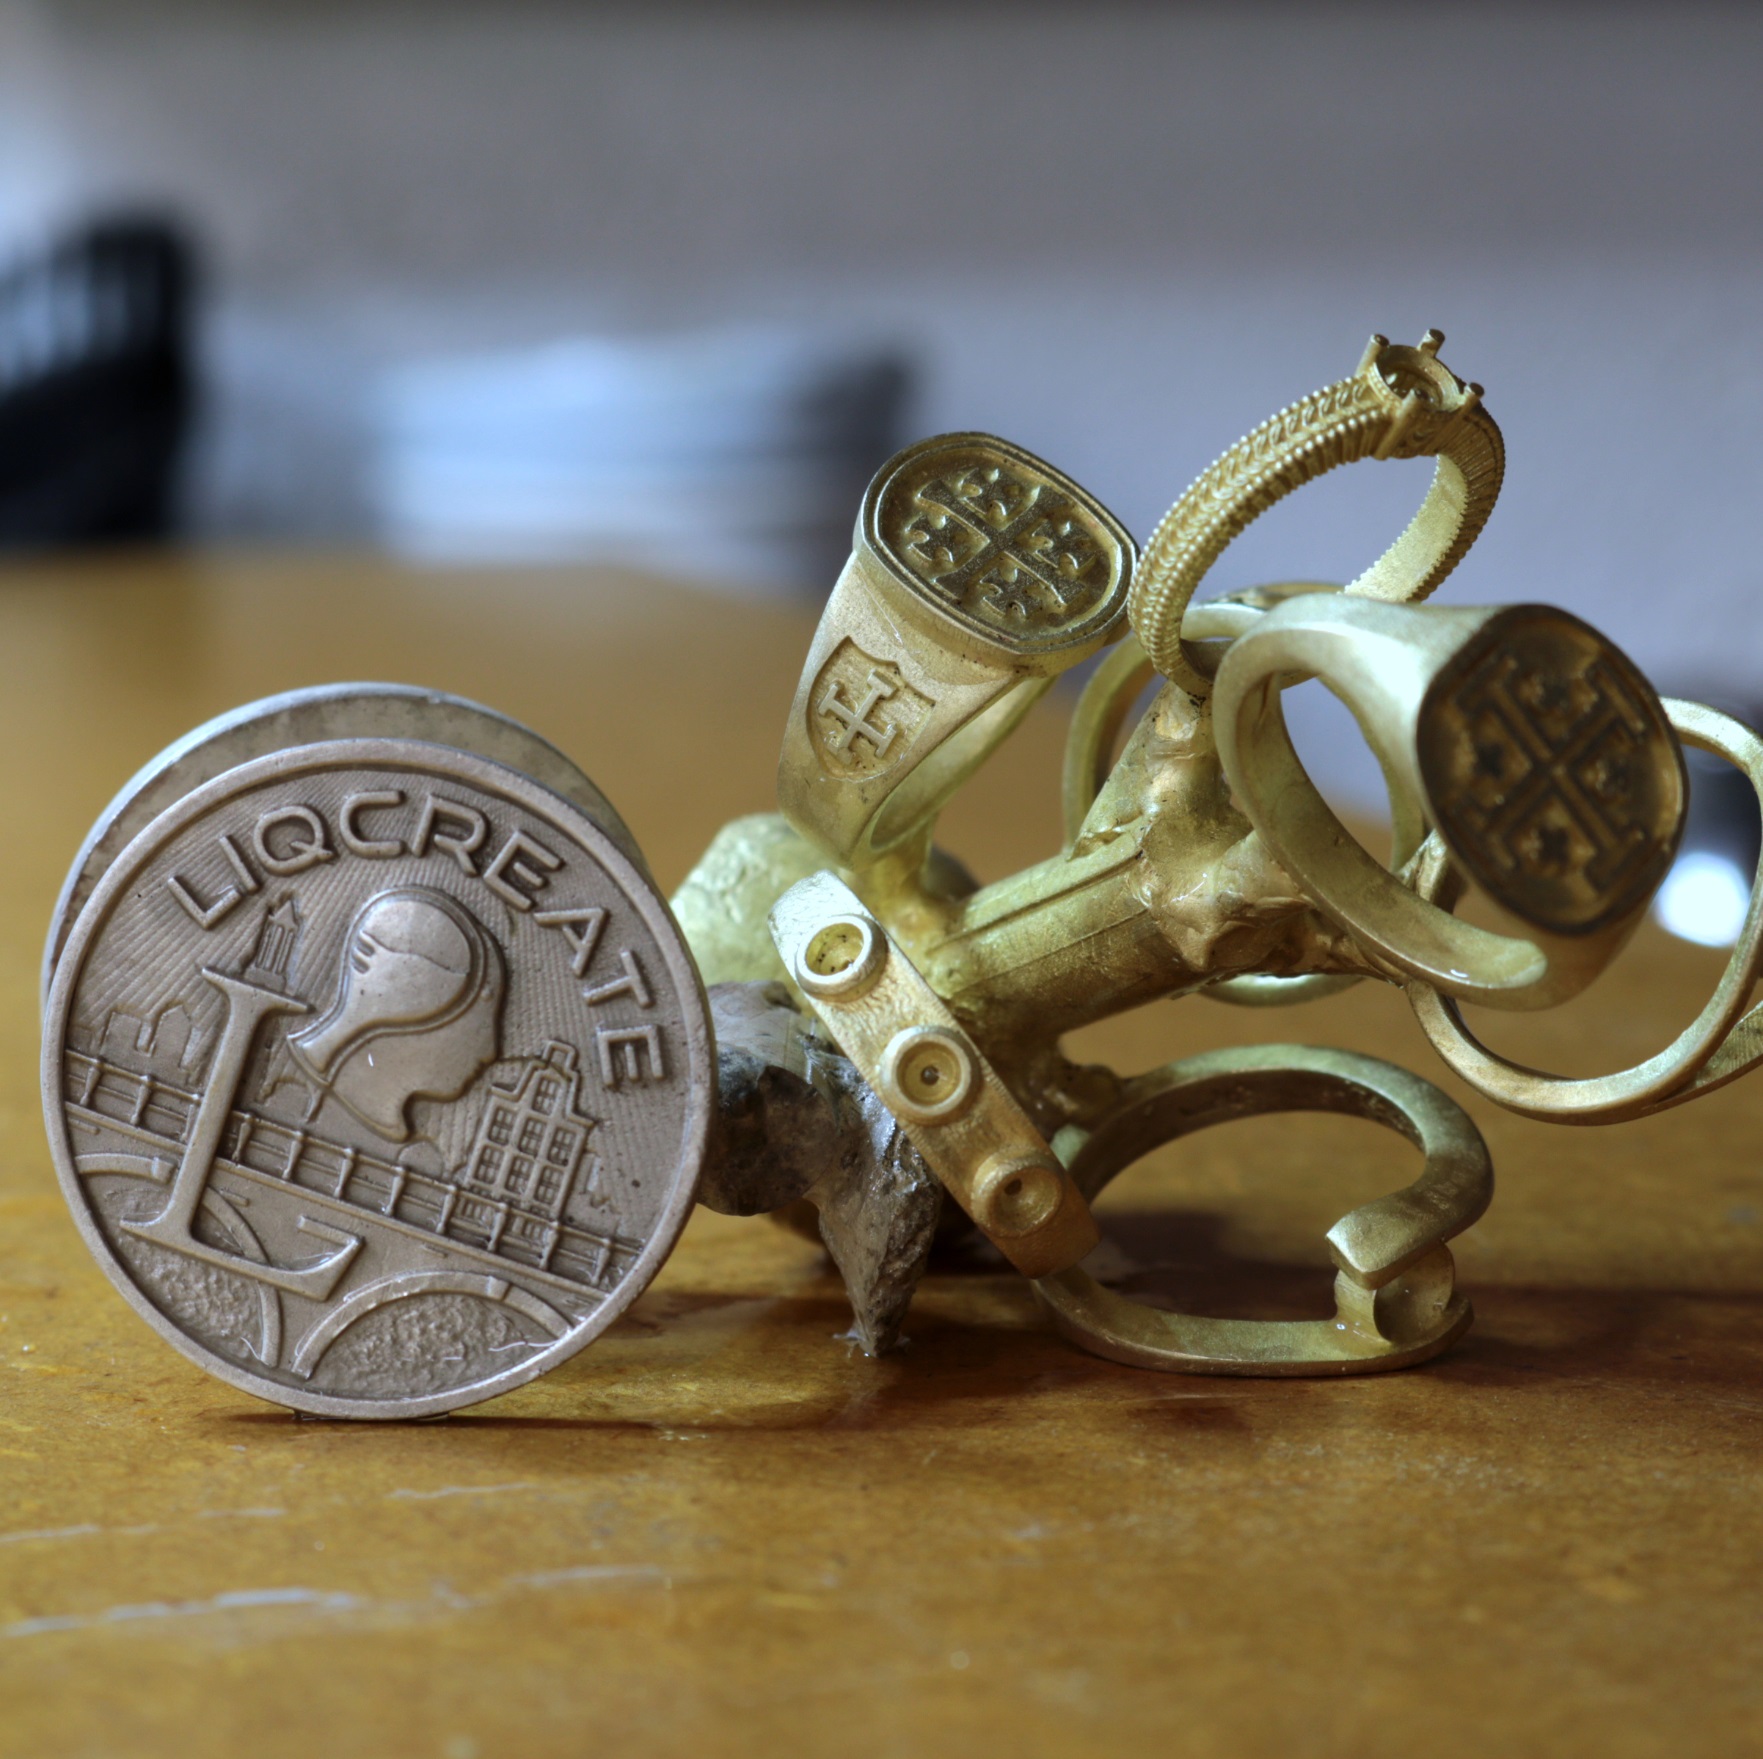
Image of the final result: Medallion casted in silver 999 and jewelry made from brass.
Designing the ideal test part for jewelry casting.
Mr. Dombrun explains how he started this project by designing the STL file (digital designed file) for testing “In order to have a range of obstacles, I need very fine details and various levels in the design that are both simple and complex. I made a medal using the Liqcreate logo and features of the city of Utrecht, Netherlands, with a watermark. A small sketch, even a simple one, is necessary. Some parts can be complex, it is up to you to think about the feasibility. Create a range of details like indents, text, everything you think you want to bring to your model. It will be unique!”
On the sketch below you can find the following details:
A: Company logo in relief, slightly rounded and structured.
B: The first letter of the Logo in relief at the outer edge.
C: Drawing of one of the bridges of Utrecht with the balustrade in relief.
D: a typical house in Utrecht and the horizon.
E: Watermarks in fine rays.
F: The company brand.
G: Thickness of the piece.
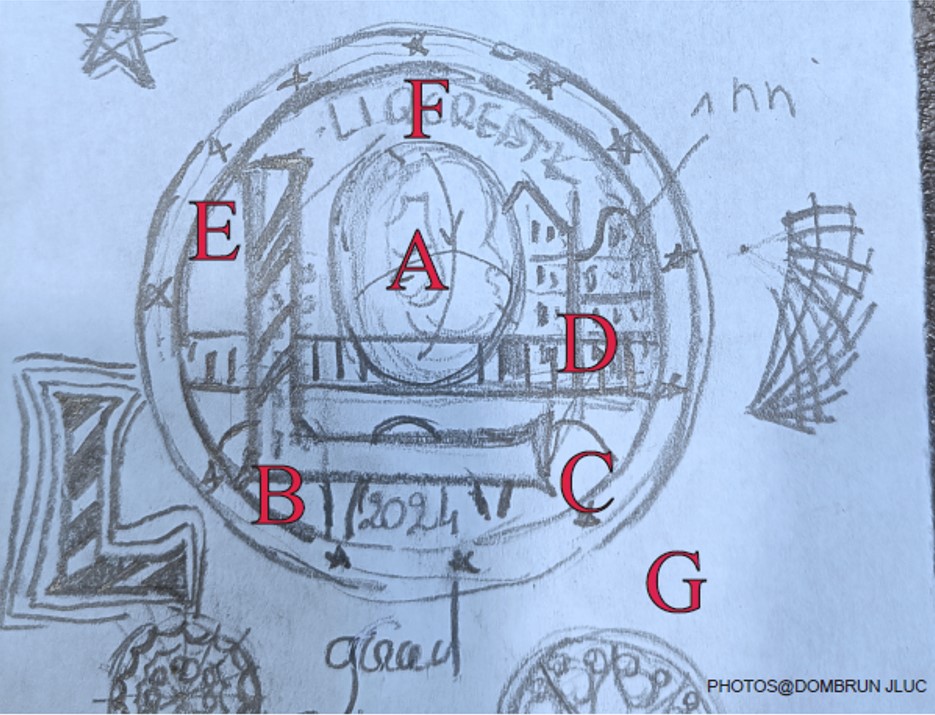
Left image: The manual sketch of the medal to be 3D-printed with Liqcreate Wax Castable resin and casted in silver.
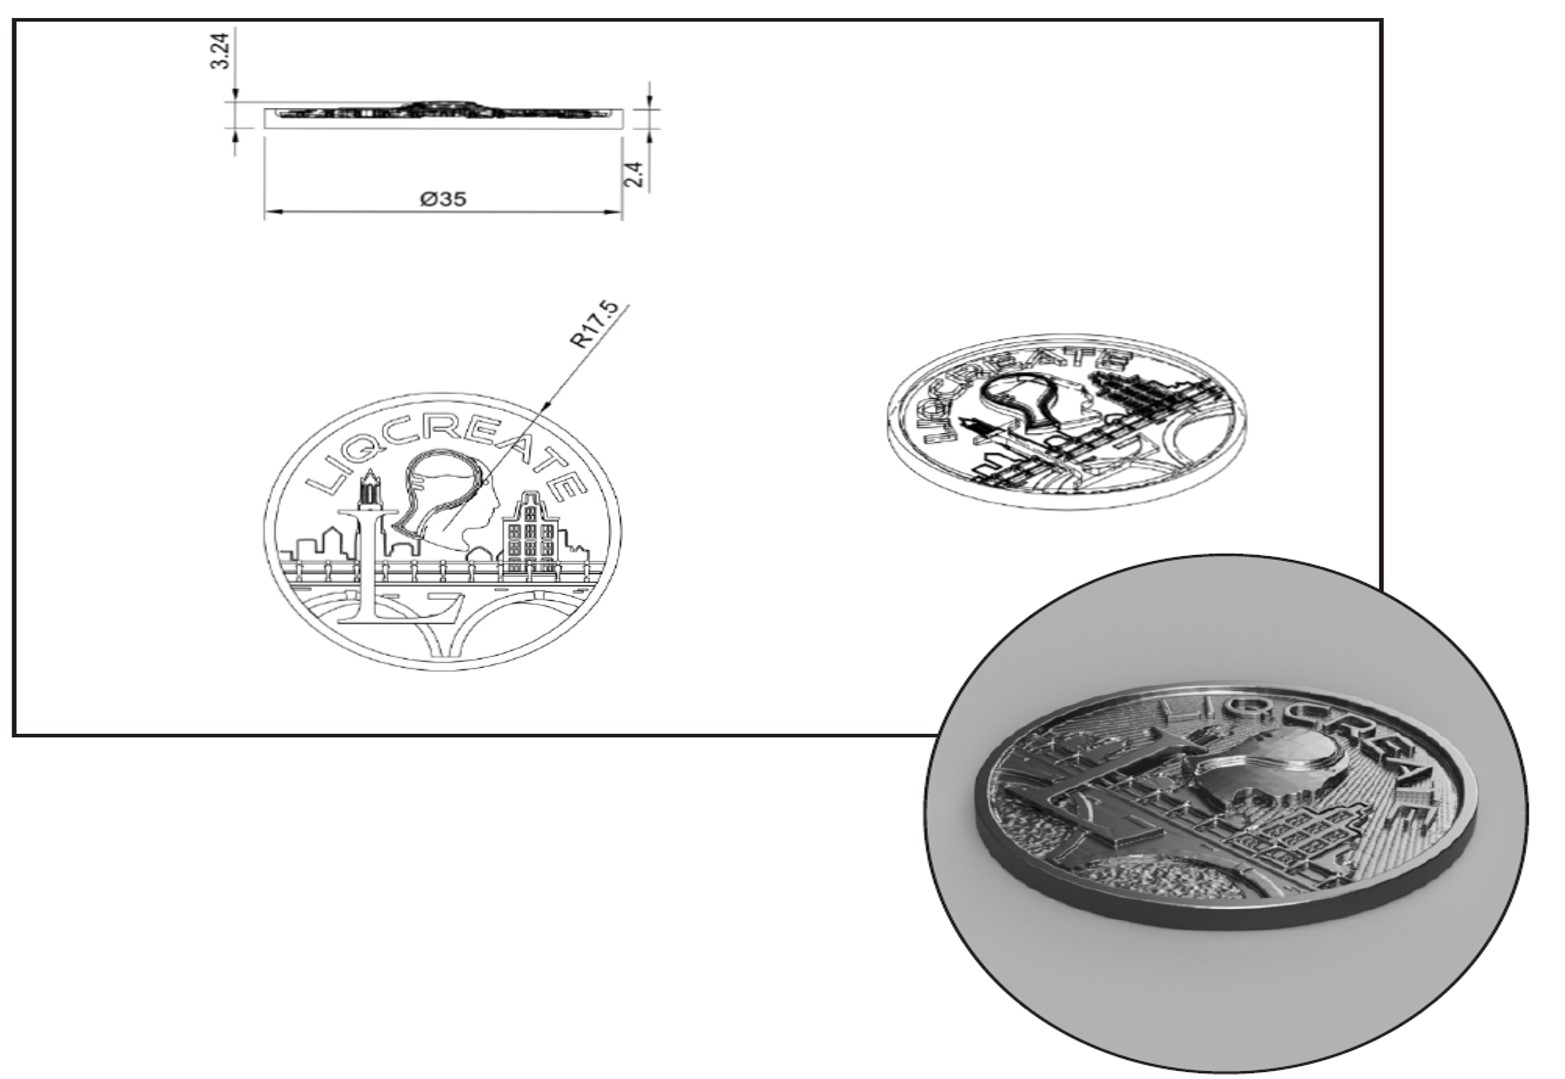
Right image: converting the sketch to a 3D-model which can be 3D-printed
Preparation for resin 3D-printing
After the drawings are finished, load the .STL files into the software (Chitubox or other slicing software). Which slicing software to use depends on the printer you have. Chitubox, Lychee and Voxeldance support most entry-level resin 3D-printers. Sometimes the 3D-printer manufacturers developed their own slicing software. The positioning of the files is of great importance. Mr. Dombrun continues: “With experience, I realized that the orientation of your part is important. Therefore, placing the supports at the right position is of most essence. If the suports are poorly placed, they will mark the smallest details. these marks are difficult to erase afterwards. How to position your part depends on the geometry and details to be saved. For my part the vertical position part saves the details, but generates the staircase effects on the roundings (less with the Anti-Aliasing and blur settings), although more pieces will fit on the build plate. I place the part “almost vertically” (example B: 5-10° angle) in order to reduce unnecessary supports on the faces. I reinforce the base with some large supports so that the part holds firmly on the build plate. To make the explanations easier, I have chosen several positions, you will see that the best is closer to vertical positioning in the images below.”
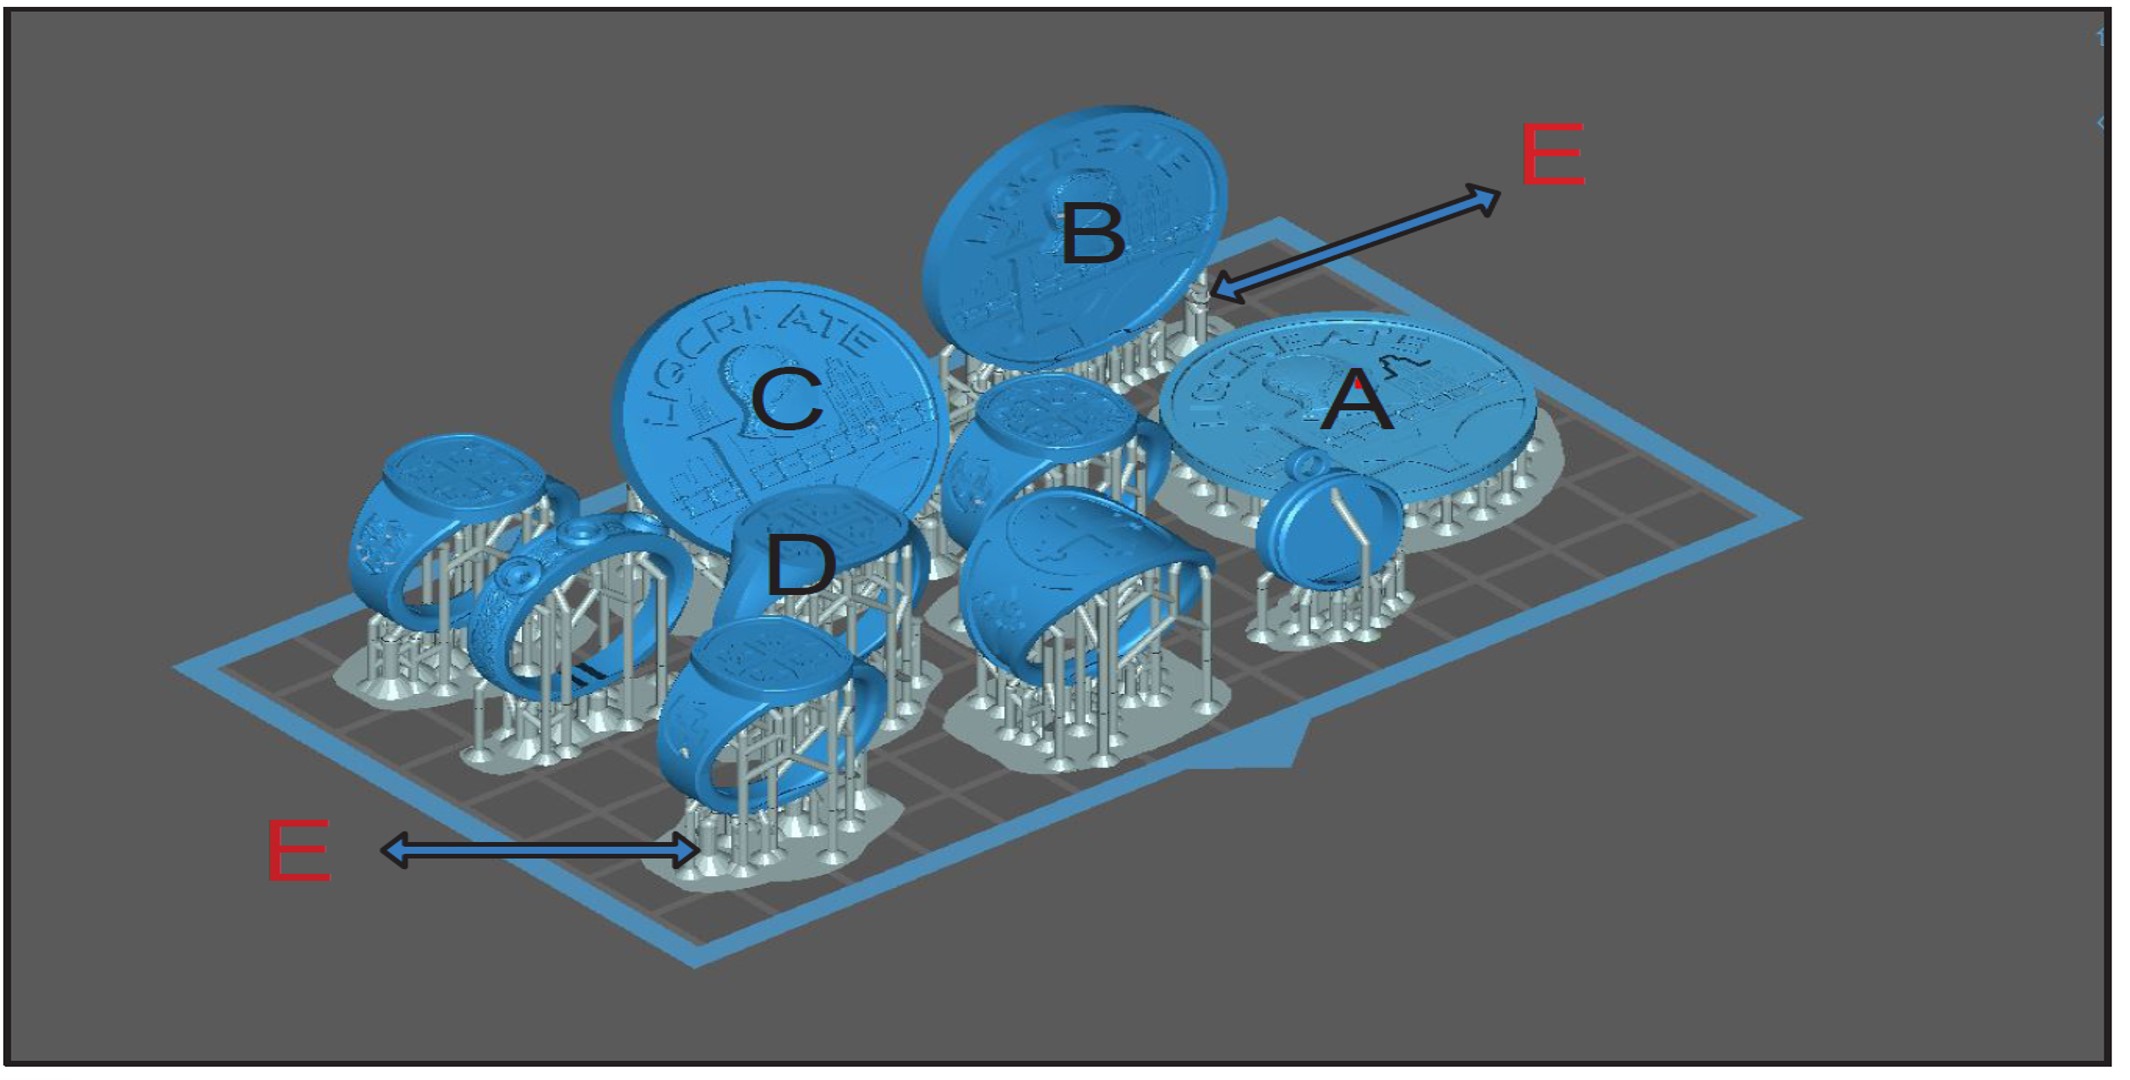
Image: Positioning jewelry parts for 3D-printing with Liqcreate Wax Castable resin in the slicing software from Chitubox.
In position A the medal is placed flat on the build plate and lifted 6 mm before placing it on supports. This way the engravings are preserved, but the back will have a lot of support marks which need sanding later. In position B the part is placed perpendicular to the build plate in an angle of 85 to 95°. By positioning the part in this way, the supports do not longer touch the back of the medal. Add in all cases, 3 large supports (E), this is for Mr. Dombrun the best solution for flat-backed medallions. In position C the medallion is tilted at 20°. The surface with details is preserved, but there will be sanding on the back! In example D, the rings are approximately vertical. Ideally they are placed at 5° and only position the necessary supports on the upper inner part. The results of these different printing positions can be seen below. It can be seen that the back of example B is much better, although in all 3 cases the area with details (front) is in perfect shape.
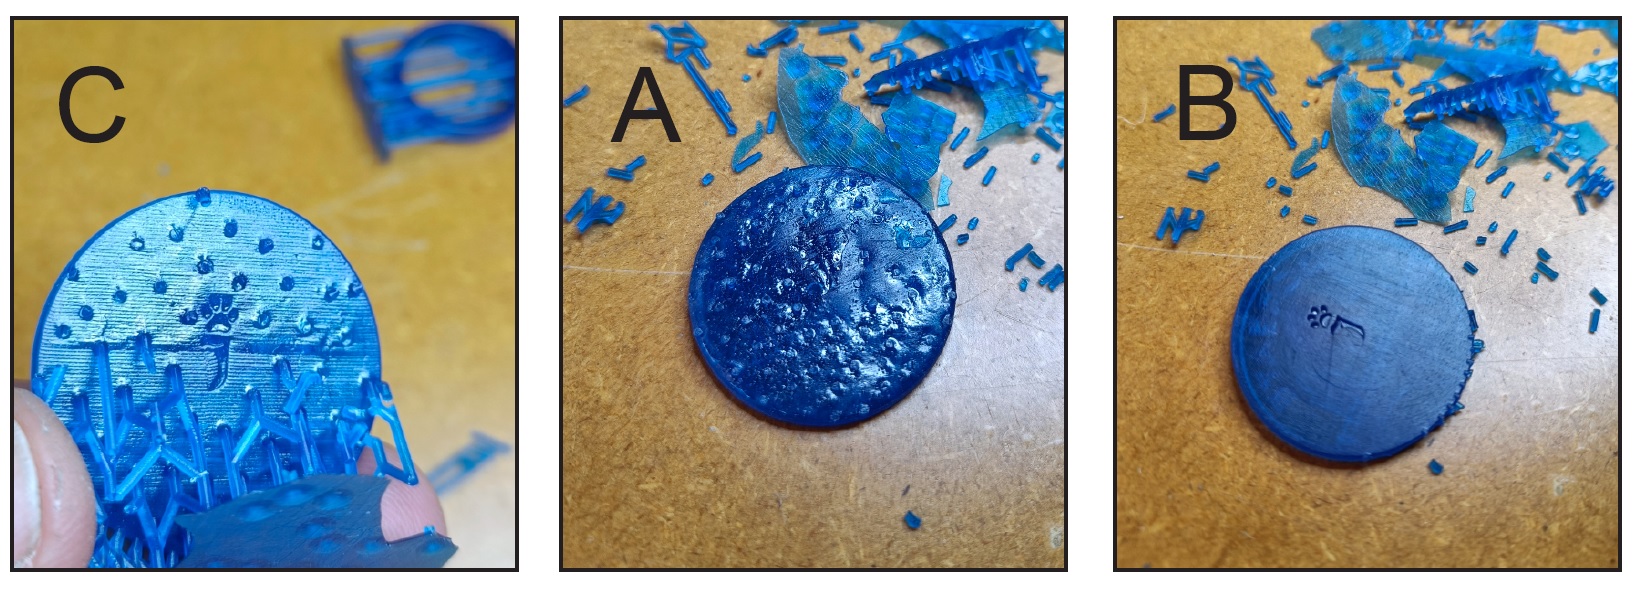
Image: Positioning in jewelry parts is important to preserve the areas of detail and minimize manual labor. The best option would be possition B.
3D-printing parameters for Wax Castable resin.
Mr. Dombrun used the Phrozen Sonic Mini 4K printer and found the settings on the Liqcreate website for Wax Castable resin. Printing settings can be different for each printer and a lot of parameters are available on the Liqcreate 3D-printing resin parameter page.
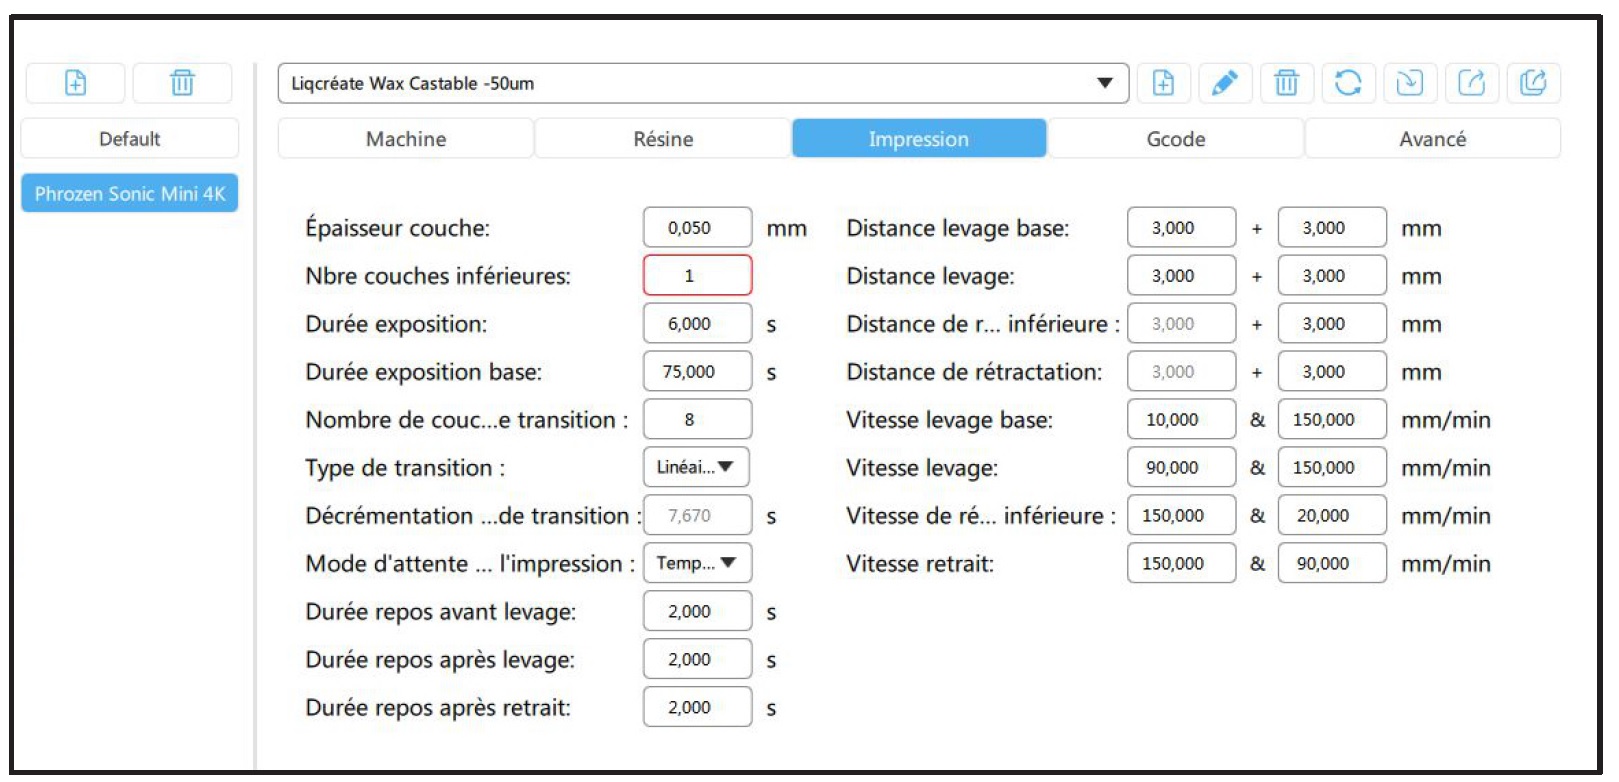
Image: 3D-printing parameters for Liqcreate Wax Castable resin for the Phrozen Sonic Mini 4K in Chitubox.
In the advanced settings, Mr. Dombrun set the anti-aliasing to 8 and the gray level to 2, the blur option is unchecked. From our own tests at Liqcreate R&D it was found that the Anti-Aliasing setting of 8 seems a high. In this previous articles about Anti-Aliasing and blur for wax castable resin Liqcreate engineers found that “If it is needed to reduce the pixilation, it is always good to stay at a Grey level between 0 and 4 and either switch blur off, or use at maximum level 2 blur. The surface will have less defined pixels when using Anti-Aliasing and blur, and some other minor defects like stripes of a fuzzy surface can appear.”
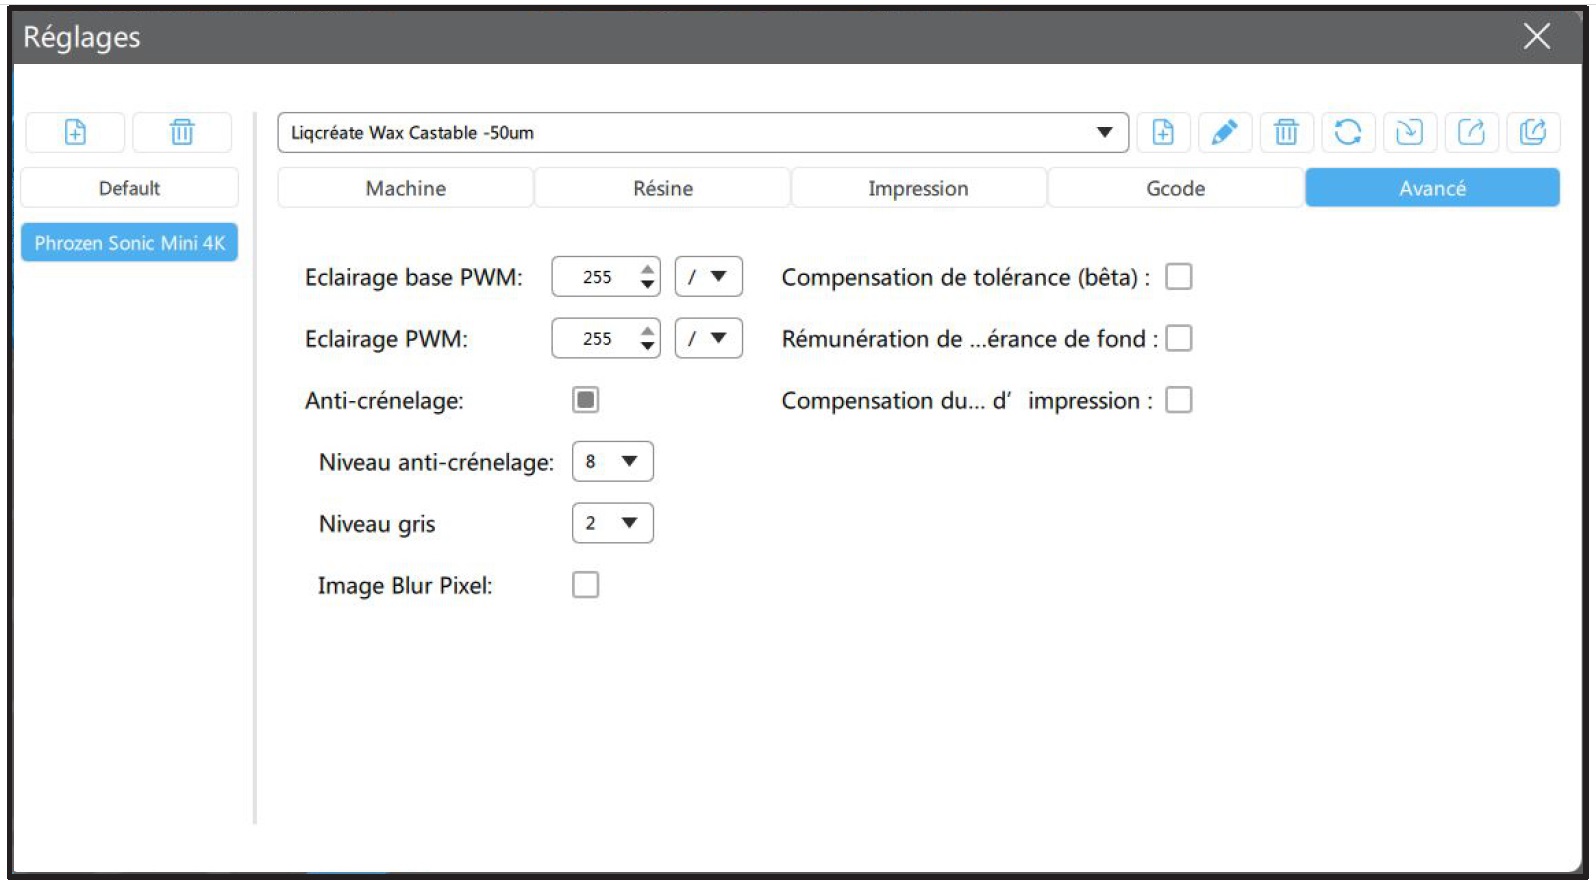
Image: Advanced settings in Chitubox used by Mr. Dombrun when printing jewelry wax castable resin parts.
Support parameters for Wax Castable resin.
Mr. Dombrun explains: “For the supports, I follow the recommended parameters on the Liqcrate website (see below), they work very well. I set the part/plate height to 6 mm with a 120% skate with a thickness of 0.1 mm (this reinforces the adhesion to the build plate to the wax castastable resin parts).”
Image: 3D-printing supports parameters from Liqcreate Wax Castable resin for the Phrozen Sonic Mini 4K in Chitubox.
Personal example of positioning.
Mr. Dombrun shares his personal view how to possition parts: “Here is how I do it: simple and efficient process! I place the parts as vertically as possible in order to limit the impact of the supports. By clicking on the supports, the skates and the positioning of the parts at 6 mm from the plate are done automatically. After placing the supports in auto-mode (medium supports), I select and delete the interfering supports (make sure not to accumulate resin on a point or an area, without weakening the structure). Then I manually add 3 heavy supports (A) in the lower area of the model and sometimes one or two on the back, depending on the piece. Excellent support!”
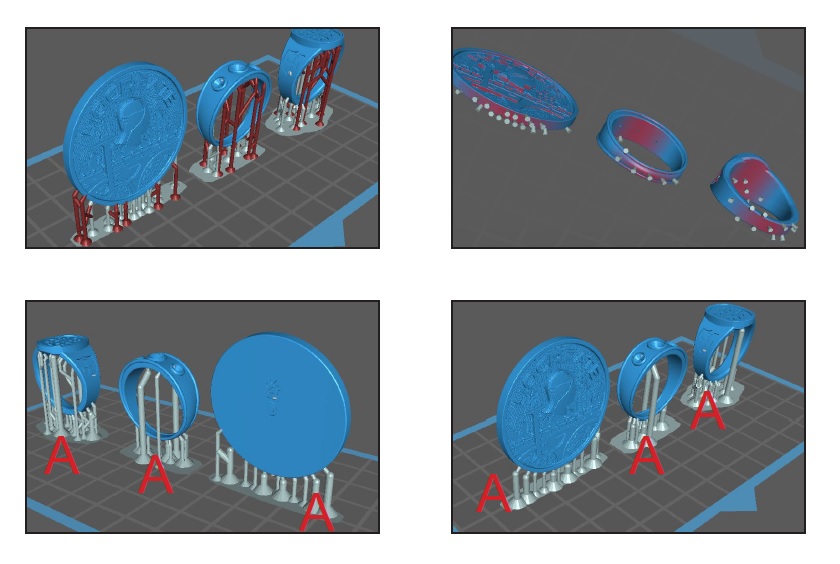
Image: Mr. Dombrun’s personal preference for supporting Liqcreate Wax Castable resin for rings and medallions.
3D-printing with Liqcreate Wax Castable resin.
“Make sure the resin temperature is between 20 and 24°C. The resin tends to thicken and solidify at lower temperatures (below 18°C / 64°F). If the resin is cold, place the Liqcreate Wax Castable bottle on a radiator or bucket of hot water for 15 minutes before printing. After printing, chop the parts of fthe build plate. Then clean the parts in a container with used cleaning agent (like bio-ethanol or IPA at a temperature >18°C / 64°F). Wash it a second time with ultrasound with a cleaning agent. I recommend blowing the parts with compressed air and putting them back for 2 minutes in the cleaning solvent to make sure there is no more resin left. You will notice that the part above is clean, non-sticky, has a matte surface finish and is well printed. Dry one last time by either waiting 30 minutes or use compresed air. Cut the supports carefully, and UV-cure 18 minutes (for small parts). Examine the parts for surface preparation before casting.” According to Mr. Dombrun.
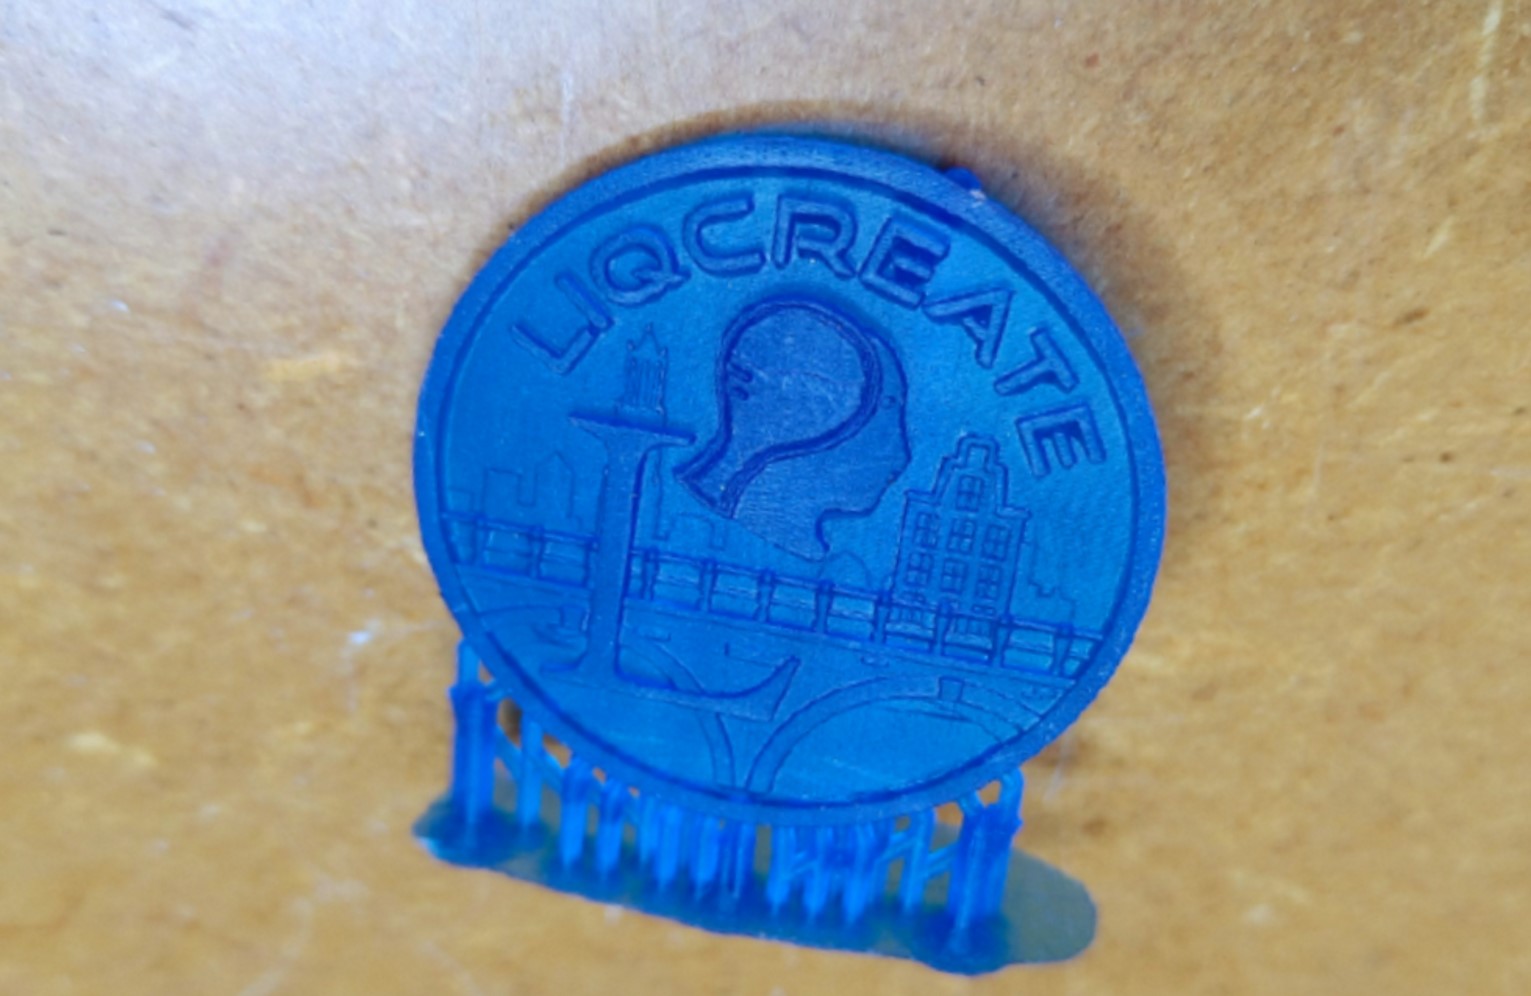
Image: Liqcreate Wax Castable resin 3D-print medallion after succesful print!
Surface preparation
” It is important that your 3D-printed part is in perfect condition before casting. If there are small defects, they will be visible in the final metal part as well and it will take a longer time to sand and polish. it is best to sanding and polishing the 3D-printed part before casting. Start with 360 and 400 grit paper, then 1000, brush off the dust.” According to Mr. Dombrun.
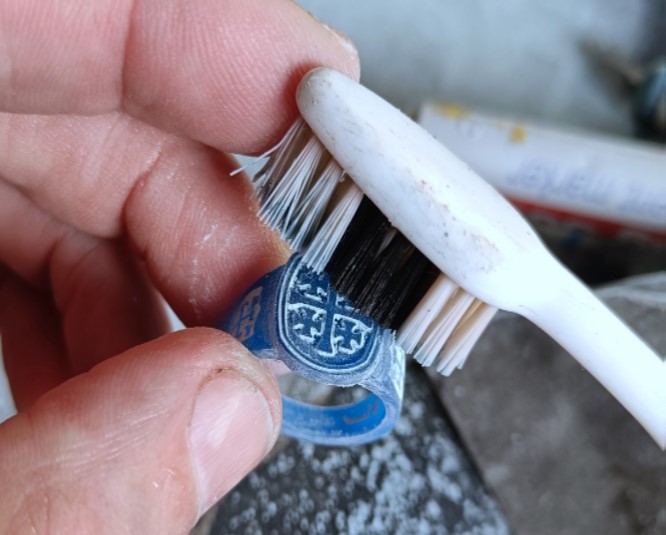
Image: Mr. Dombrun brushes off the 3D-printed Wax Castable resin part.
Surface preparation
Mr. Dombrun continues with his story: “After sanding, brush your parts well. You certainly have micro-scratches and perhaps small holes or defects, apply a drop of blue wax using a soldering iron, even out with a cutter blade and rub using a nylon stocking impregnated with lighter fluid. Polish the surface as best you can dry. To reduce micro-scratches as much as possible, I use a “popotte” (self-made mixture of ferris injection wax or microcrystalline wax diluted with toluene or methanol to act as an agent to achieve the best possible surface finish) that I spread over the entire piece, I leave it to act for 30 seconds, I brush and I polish with a nylon stocking and a large brush. Do not hesitate to go over it a second time if necessary, even on engravings. ”
Engraving and surface effects
According to Mr. Dombrun: “Sometimes sanding is difficult and you want to apply a surface effect (you can see it in the original drawing via SculptGL). Using a mini-mill, it is easy to create a rough or grooved surface. Brush off the dust well and go over it a little “popotte”, polish and that’s it! We are finally ready for casting!”
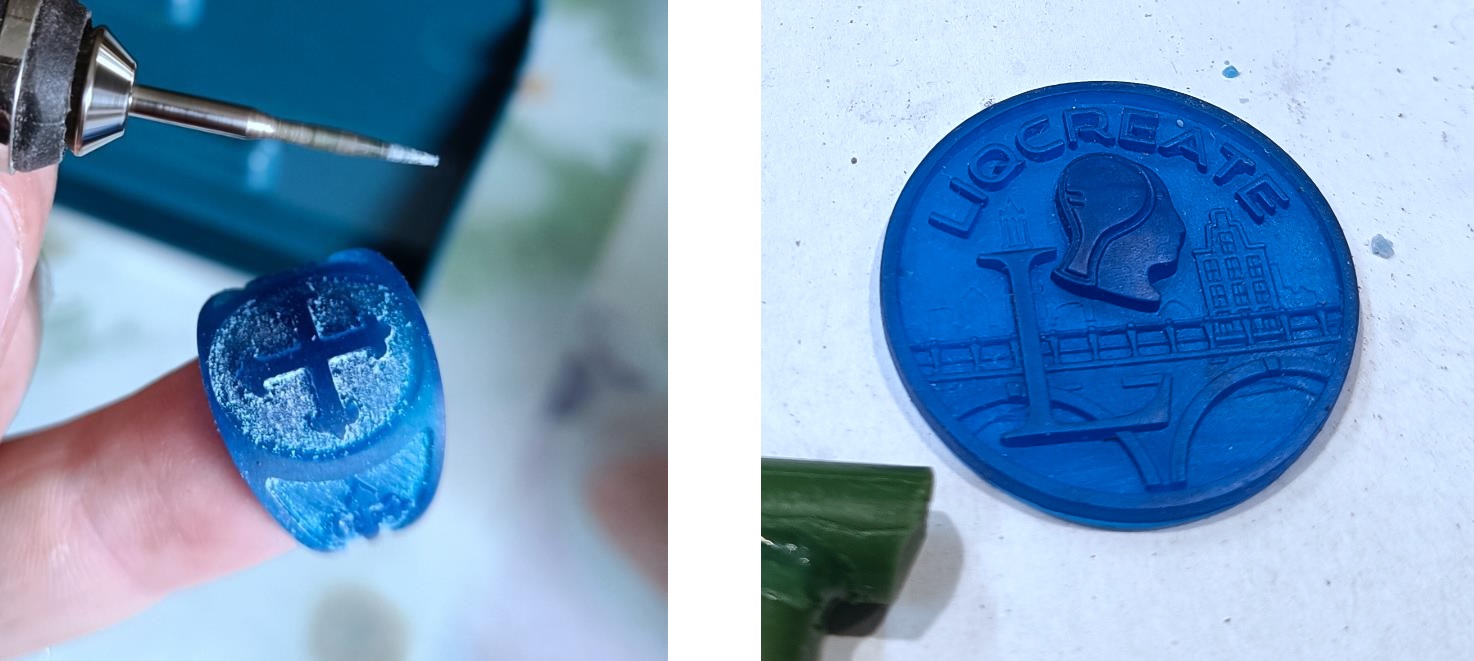
Image: Final surface preparations (optional) for casting with Liqcreate Wax Castable resin.
Preparation of the casting tree.
Mr. Dombrun continues: “Finally, we come to the trickiest part! For this project, I made two casting trees, one for silver, the other for brass, in order to see the positioning of the parts. Molten metal is like water, you have to guide the molten metal through small paths. For me everything starts with the contact of the tree with the part. The diameter of the path must be adapted to the constraints, but, in order not to have to place multiple feeds, I only place one (if possible) but with a larger diameter. Cut the feed at an angle before gluing, for the part (larger feed surface) and ovalize the one for the rings. As standard practive the larger models go on the foot of the casting tree while the smaller models are placed on the top.”
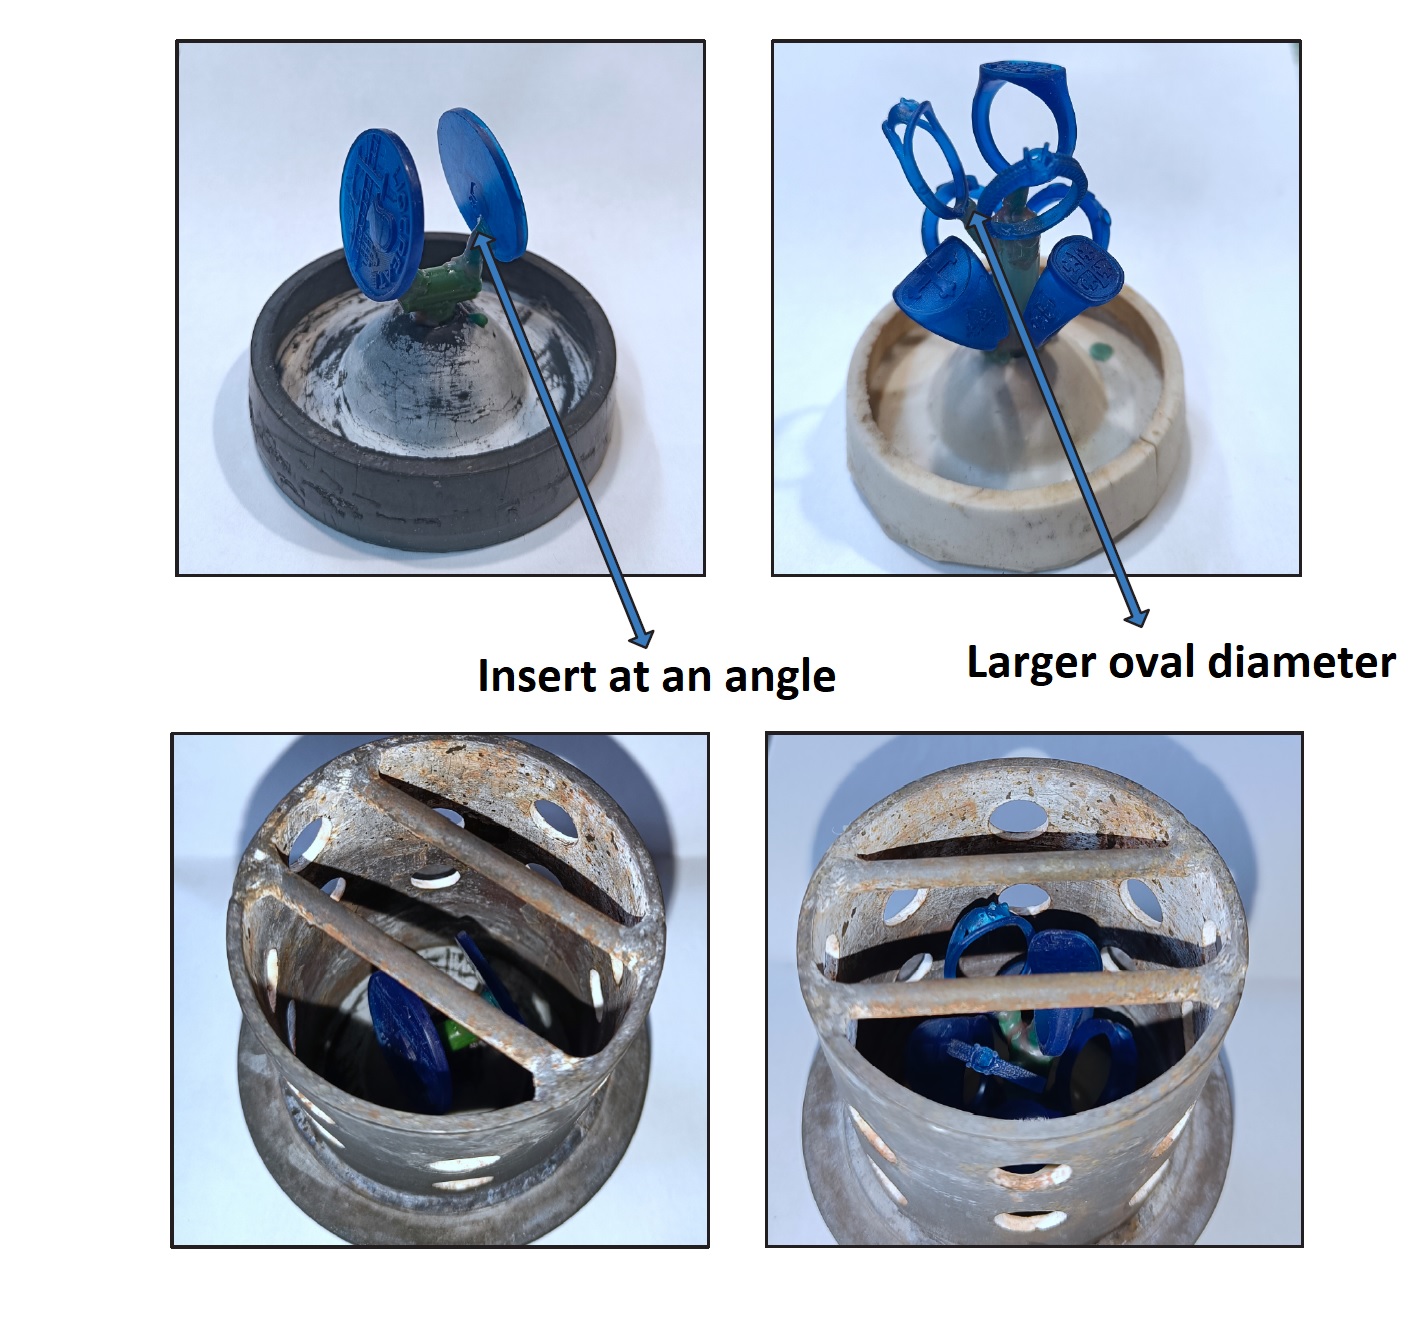
Image: Final surface preparations (optional) for casting silver with Liqcreate Wax Castable resin.
“It’s not easy to find information at this level, I hope to answer some of your questions below. Don’t spend your time trying to create powder mixes, I managed to get a recipe out, which I use for parts without too many fine details, like statuettes, quite hard to unmold (but effective). So I opted for two powders from quite different brands: Optima Prestige and Plasticast. The latter is ideal for fragile resin parts. Why? Optima supports a higher temperature, very appreciable and reliable burn-out. The burn-out time is approximately 10 hours. Plasticast has a big advantage for casting 3D wax resins as it forms a protective “shell” during the burn-out cycle. Not negligible when there are very small parts and the burn-out cycle takes about 9 hours. In this project I used Plasticast. The cylinders are ready, cast at 24°, under vacuum, rest for a few hours, the shot is calculated according to the weight of wax, see tables below.” According to Mr. Dombrun.
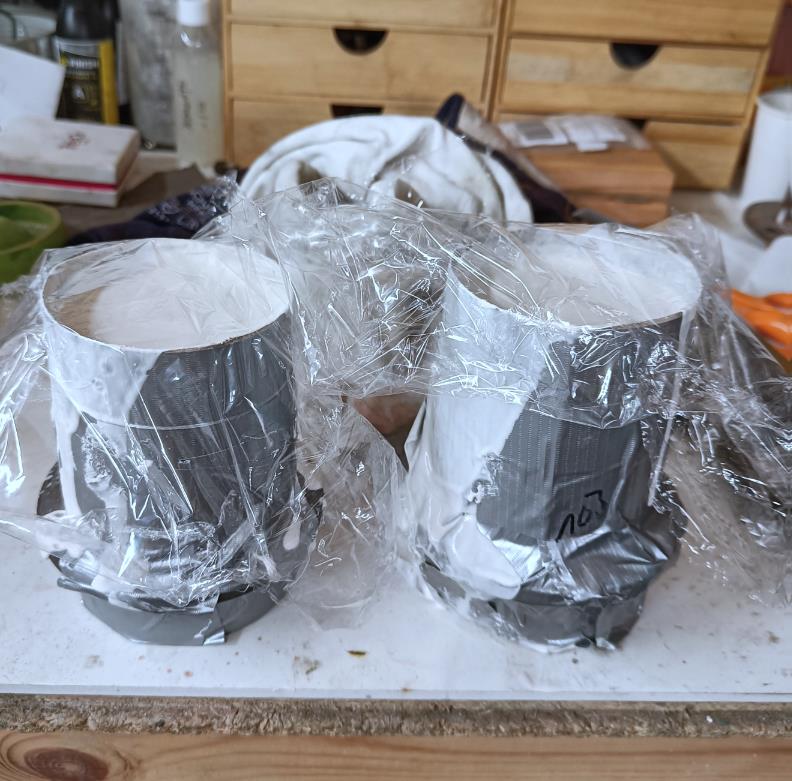
Image: preparing the casting cylinders for silver and brass with 3D-printed Liqcreate Wax Castable resin patterns.
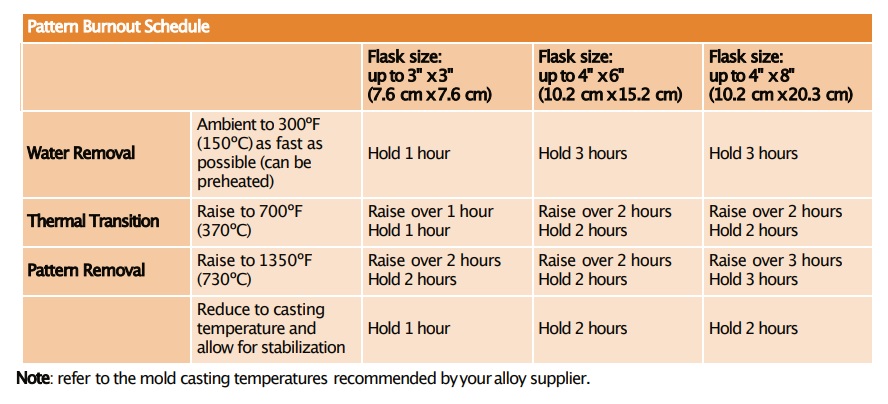
Image: Mr. Dombrun uses the burnout schedule for the smallest flask size of 3″x 3″(7.6 cm X 7.6 cm) in combination with Liqcreate Wax Castable resin.
Table in degree Celcius.
| Metal | Temperature of the metal (°C) | Temperature of the cylinder (°C / °F) | Metal / Wax Ratio |
| Aluminium | 680 – 750°C | 220 – 450°C | 2.5:1 |
| Brass | 1020 – 1120°C | 500 – 700°C | 9:1 |
| Silver 925 | 950 – 1050°C | 450 – 650°C | 10:1 |
| Silver 999 [Setting from Mr. Dombrun] | +/- 965°C | 610°C | 10.5:1 |
| Yellow Gold 9 carat | 940 – 1040°C | 500 – 600°C | 11:1 |
| Yellow Gold 12 carat | 650 – 1050°C | 500 – 600°C | 12:1 |
| Yellow Gold 22 carat | 1040 – 1140°C | 500 – 700°C | 18:1 |
| White Gold 9 carat | 970 – 1070°C | 580 – 680°C | 12:1 |
| White Gold 14 carat | 1050 – 1170°C | 600 – 700°C | 14:1 |
| White Gold 18 carat | 1100 – 1250°C | 600 – 740°C | 16:1 |
Table in degree Fahrenheit.
| Metal | Temperature of the metal (°C / °F) | Temperature of the cylinder (°C / °F) | Metal / Wax Ratio |
| Aluminium | 1256 – 1382°F | 428 – 842°F | 2.5:1 |
| Brass | 1868 – 2048°F | 932 – 1292°F | 9:1 |
| Silver 925 | 1742 – 1922°F | 842 – 1202°F | 10:1 |
| Silver 999 [Setting from Mr. Dombrun] | +/- 1769°F | 1130°F | 10.5:1 |
| Yellow Gold 9 carat | 1724 – 1904°F | 932 – 1112°F | 11:1 |
| Yellow Gold 12 carat | 1202 – 1922°F | 932 – 1112°F | 12:1 |
| Yellow Gold 22 carat | 1904 – 2084°F | 932 – 1112°F | 18:1 |
| White Gold 9 carat | 1778 – 1958°F | 1076 – 1256°F | 12:1 |
| White Gold 14 carat | 1922 – 2138°F | 1112 – 1292°F | 14:1 |
| White Gold 18 carat | 2012 – 2282°F | 1112 – 1364°F | 16:1 |
Table: Information on casting temperature of the metal, casting temperature of the flask and wax to metal ratio.
Pouring of the molten metal.
Mr. Dombrun continues: “After the ~9 hour burn-out time, the time has come to cast the metal. I start with the 999 silver (on the left) which is almost melted. The castings in brass can be found on the right side. A flask / cylinder temperature of 550°C is used for casting silver with thick pieces and maximum of 650°C for thinner pieces. Because I use small cylinders, I found after different tests that a flask temperature of 610° gives me satisfaction every time with silver, even with mixing thin and larger models“.
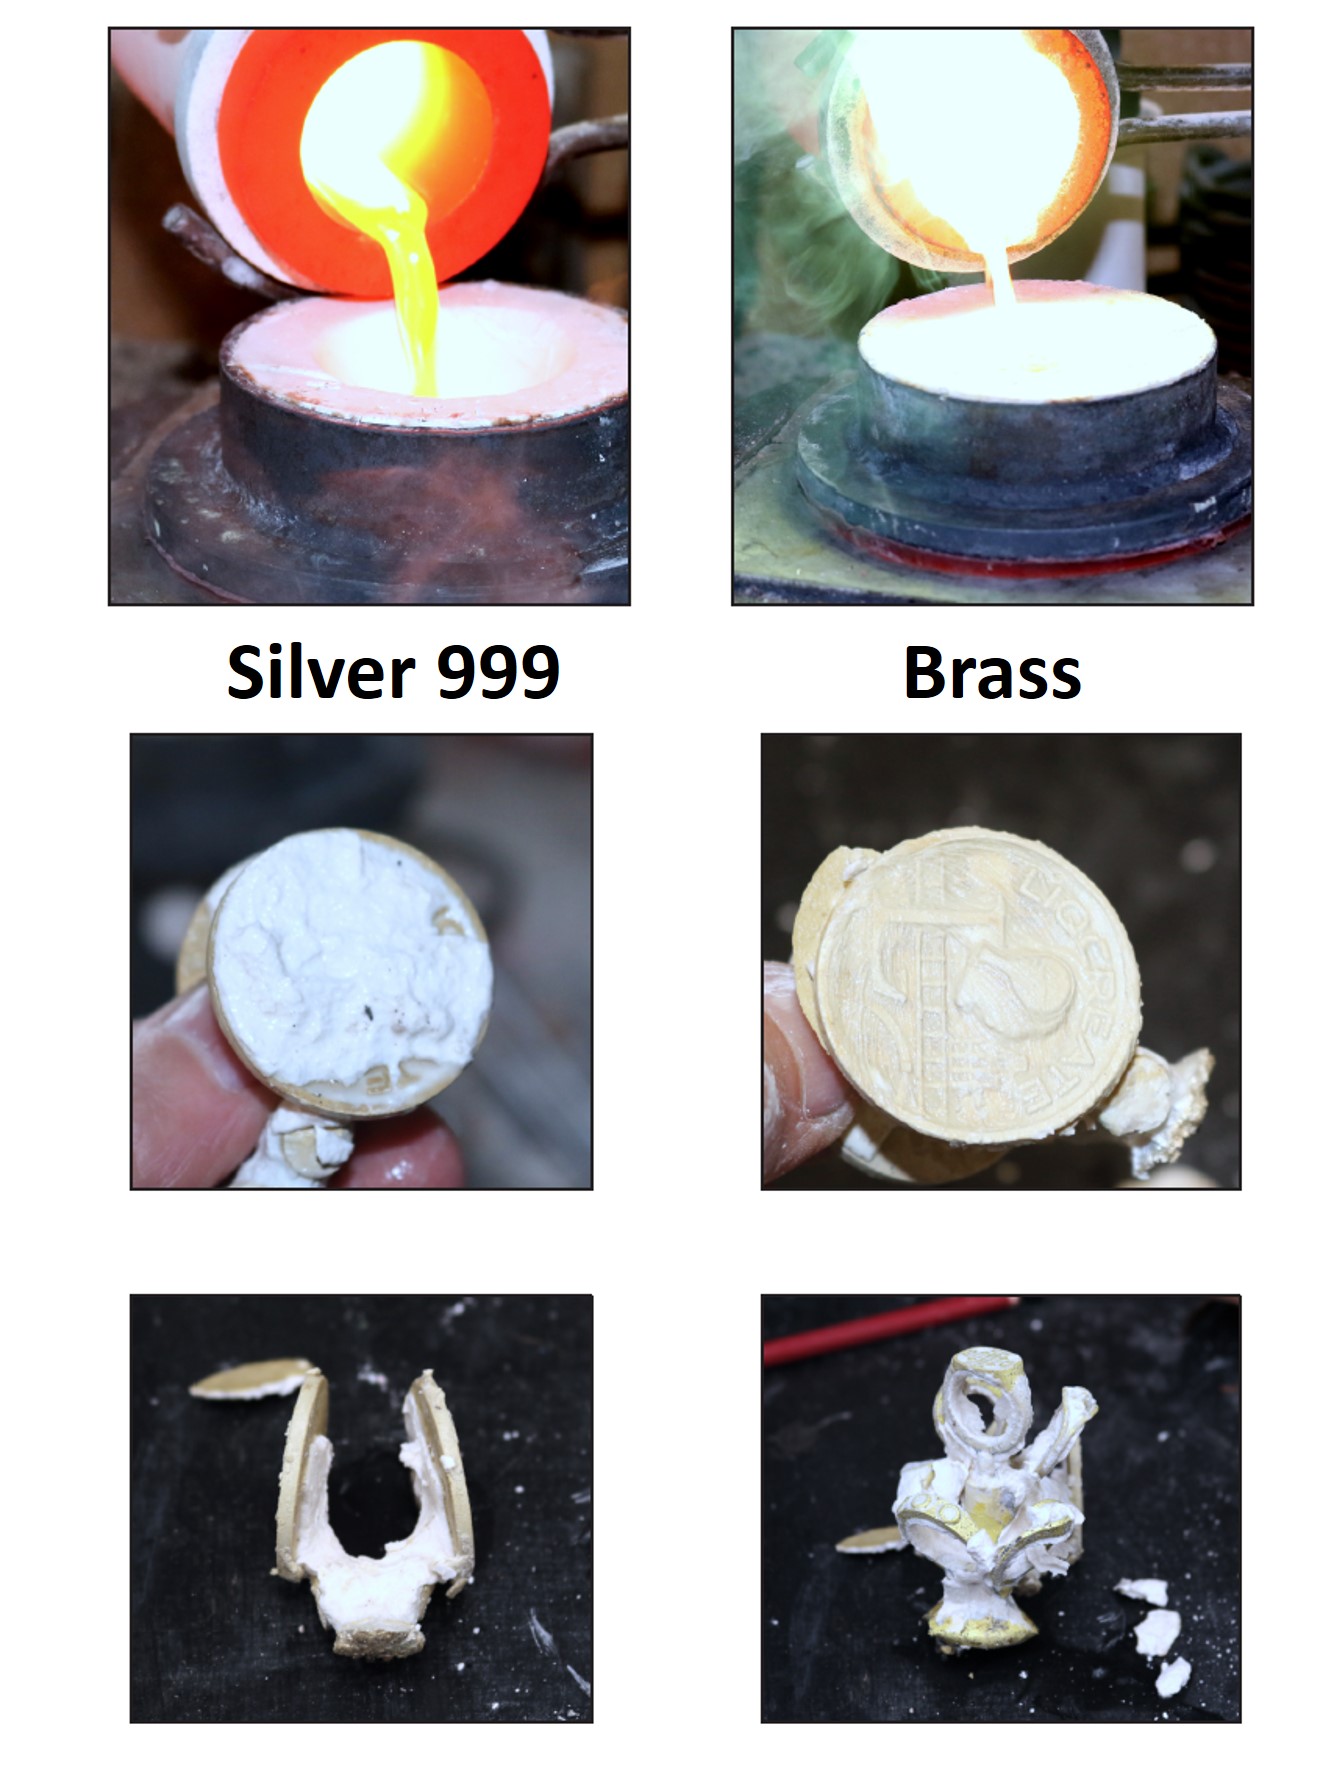
Image: ready to pour the molten metals (silver and brass) in the casting cylinders
Time for cleaning the metal parts
Mr. Dombrun continues: ” There you go, it’s done! Now all that’s left is cleaning. Take great care with silver which is more fragile. First brush with hot water (no acid for both cases, I’ll explain why later). Then clean 2 or 3 times with ultrasound (2x hot water and 1 time soap + hot water). The surfaces appear almost clean. Why won’t I place the parts in the etching acid? My metals are not burned, the Plasticast has protected the brass and silver, moreover there is no copper in the 999 silver.“
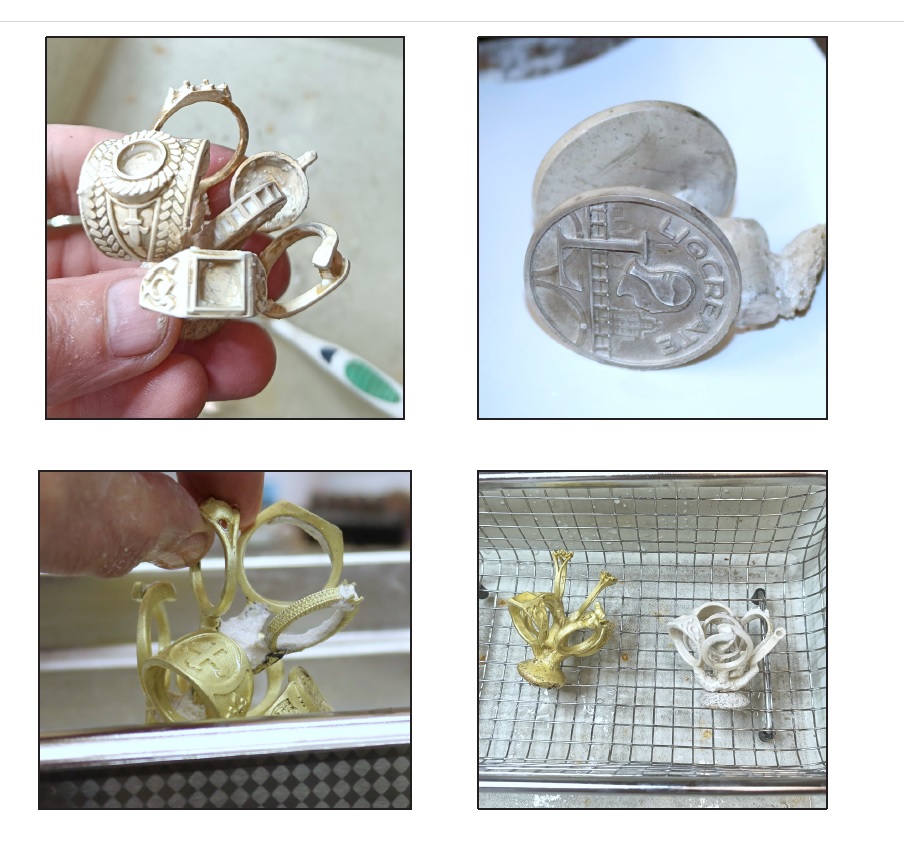
Image: cleaning the casted silver and brass parts.
Finishing and polishing.
“The parts are clean and the surface quality is dependant on the surface preparation of the resin 3D-printed part. In the pictures below I have sanded parts the back and a little on the edge of the Liqcreate medallion. I simply went over the engravings with a small brass brush before polishing. After sanding the back and the edge with 600 to 2500 grit, the polishing comes into action. Here is the result, no sanding on the engravings! It should be noted that the drawn piece had a diameter of 35 mm. After 3D-printing it was 34.81 mm and 34.74 mm in silver. If you need accurate measurements it is advised to compensate for this by scaling the STL file, or use schrinkage factors if possible. I would like to thank the company Liqcreate for allowing me to carry out this test with their 3D-printing Wax Castabe resin, which turns out to be of excellent quality and very pleasant to work with.” According to Mr. Dombrun.
Gallery

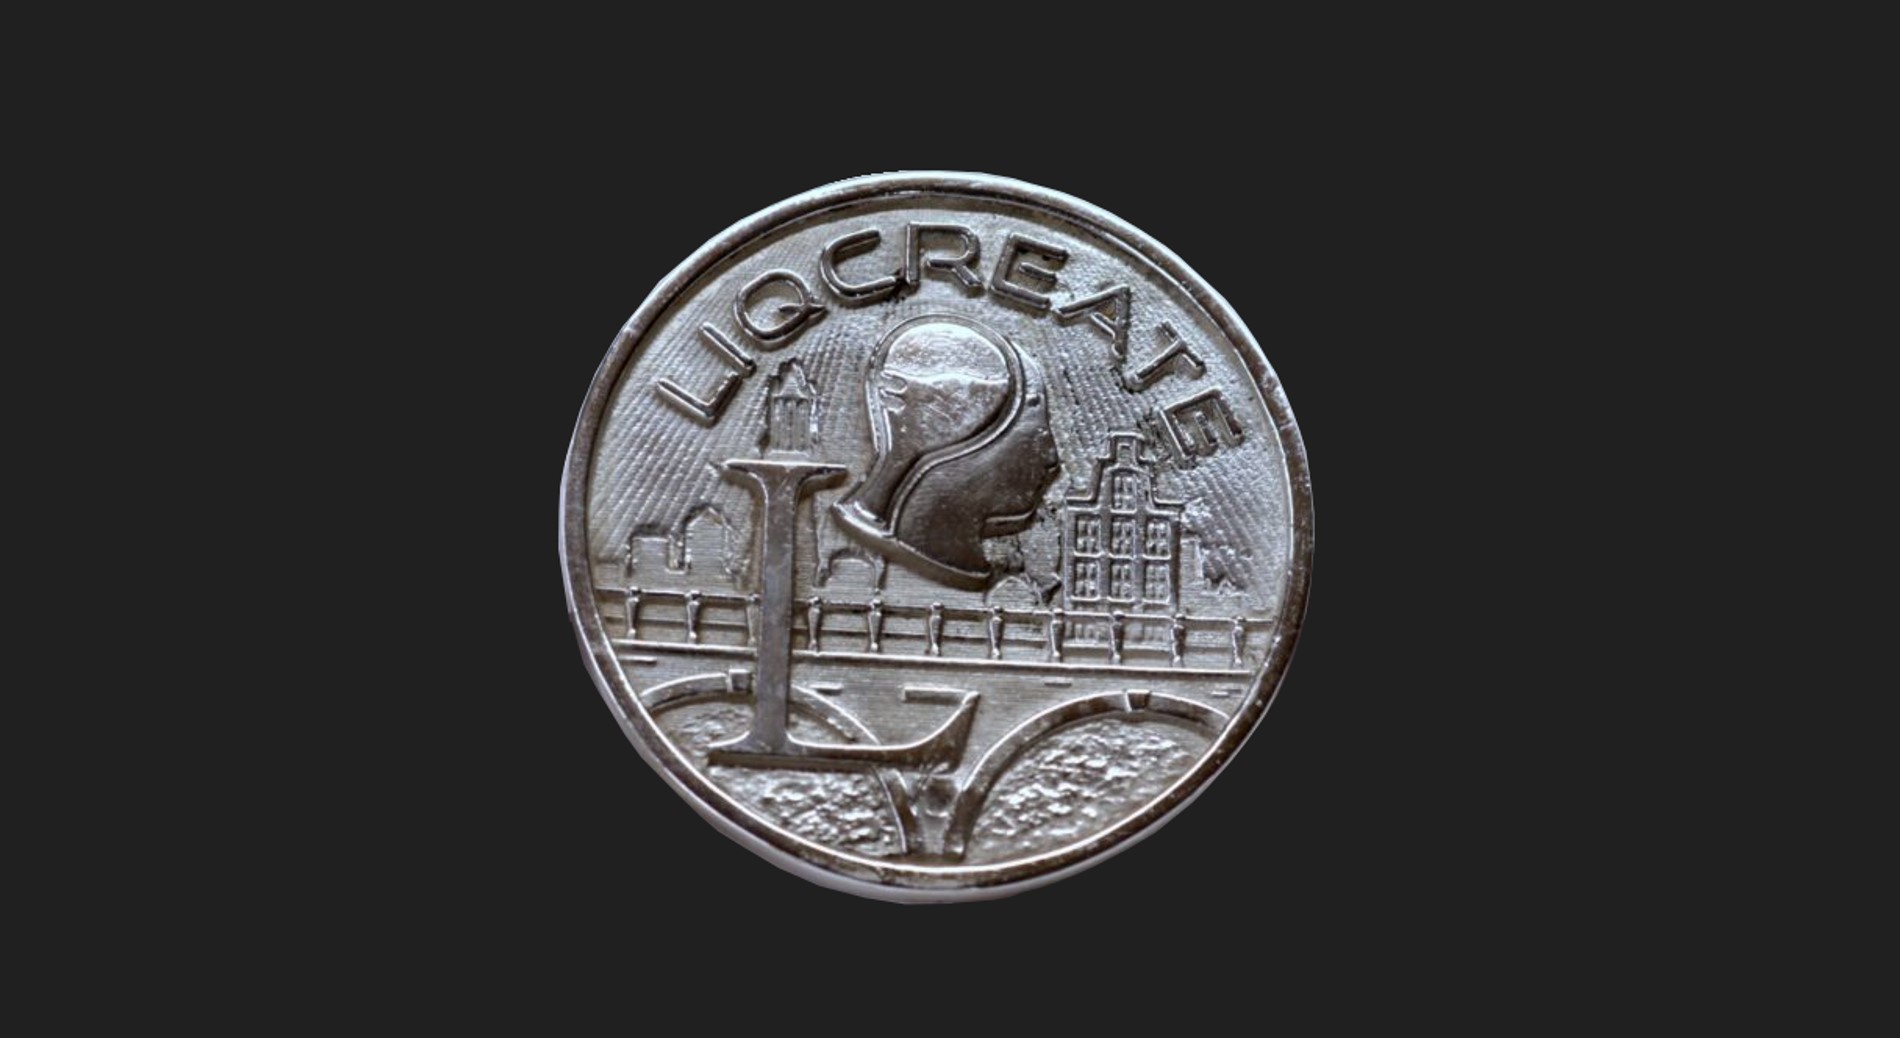
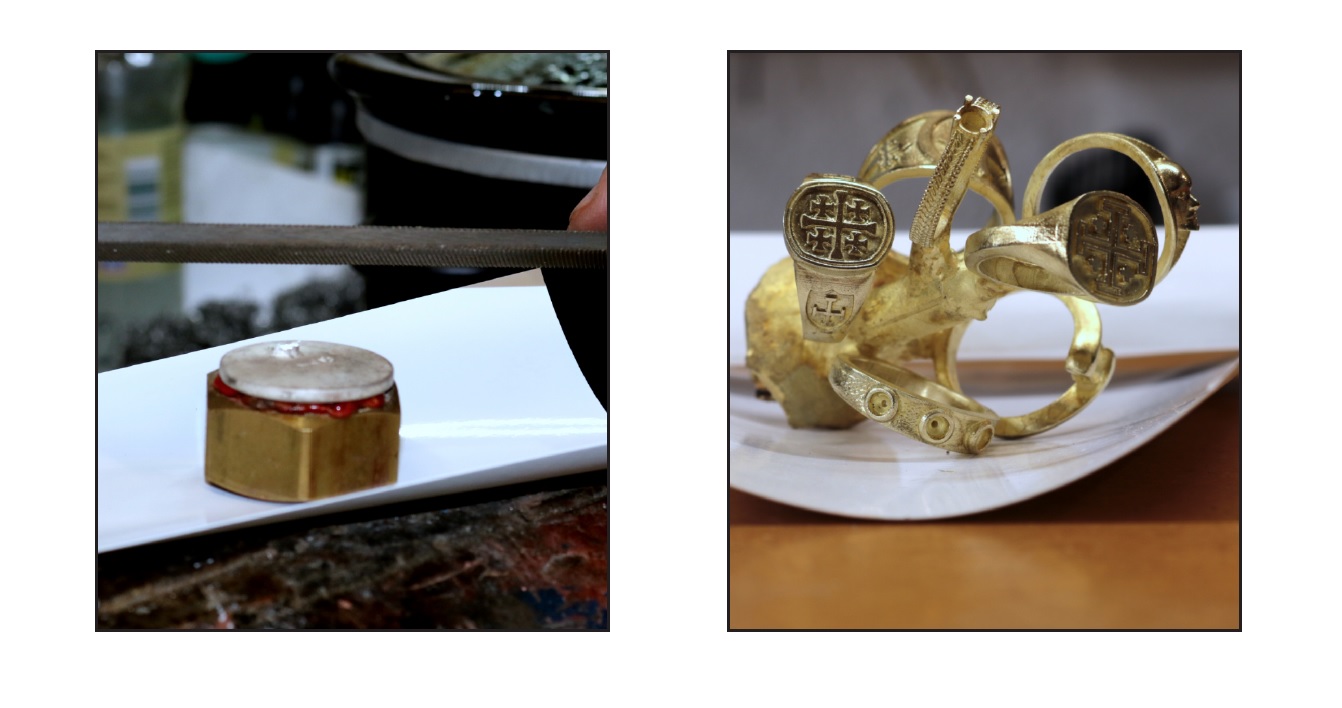
Image: Final parts in silver 999 and brass, made by casting of 3D-printed parts with Liqcreate Wax Castable resin.
Wax Castable
Liqcreate Wax Castable is a wax-based resin, perfect for manufacturing jewelry, dental and industrial parts using the direct investment casting method. Liqcreate Wax Castable is easy to use on open LCD, MSLA and DLP based 3D-printers in the range of 385 – 420nm. 3D-printed parts from this material captures intricate features and show crisp details. This wax-based material offers smooth surfaces with clean burnout for a reliable casting process. Create custom made elegant organic geometries according to your preferences with excellent casting for positive and negative engravings.
Key benefits |
3D-Printer compatibility |
| · High precision | · Asiga Max and Pro 4K |
| · Wax based | · Phrozen3D series |
| · Clean & ash-free burnout | · Elegoo & Anycubic series |
| · Excellent casting of engravings | · And many more |