From the beginning of SLA and DLP 3D-printing, rigid resins were the main available materials. Rigid resins are easy to print and do not need a great amount of skill and knowledge about the printing process. With new developments in resin technology, flexible, tough and high elongation resins are widespread available. With the release of Premium Flex, Flexible-X and Elastomer-X, Liqcreate is offering flexible and elastomer 3D-printing resin for prototyping, production and industrial use. These flexible materials require a bit extra attention in preparing the print job and in post-processing to get the best results. The following topics are covered in this article.
- – Support settings
- – Orientation of part
- – Washing of the part
- – Post-processing to get non-sticky parts
Support settings for elastomer or elastomeric 3D-printing resin
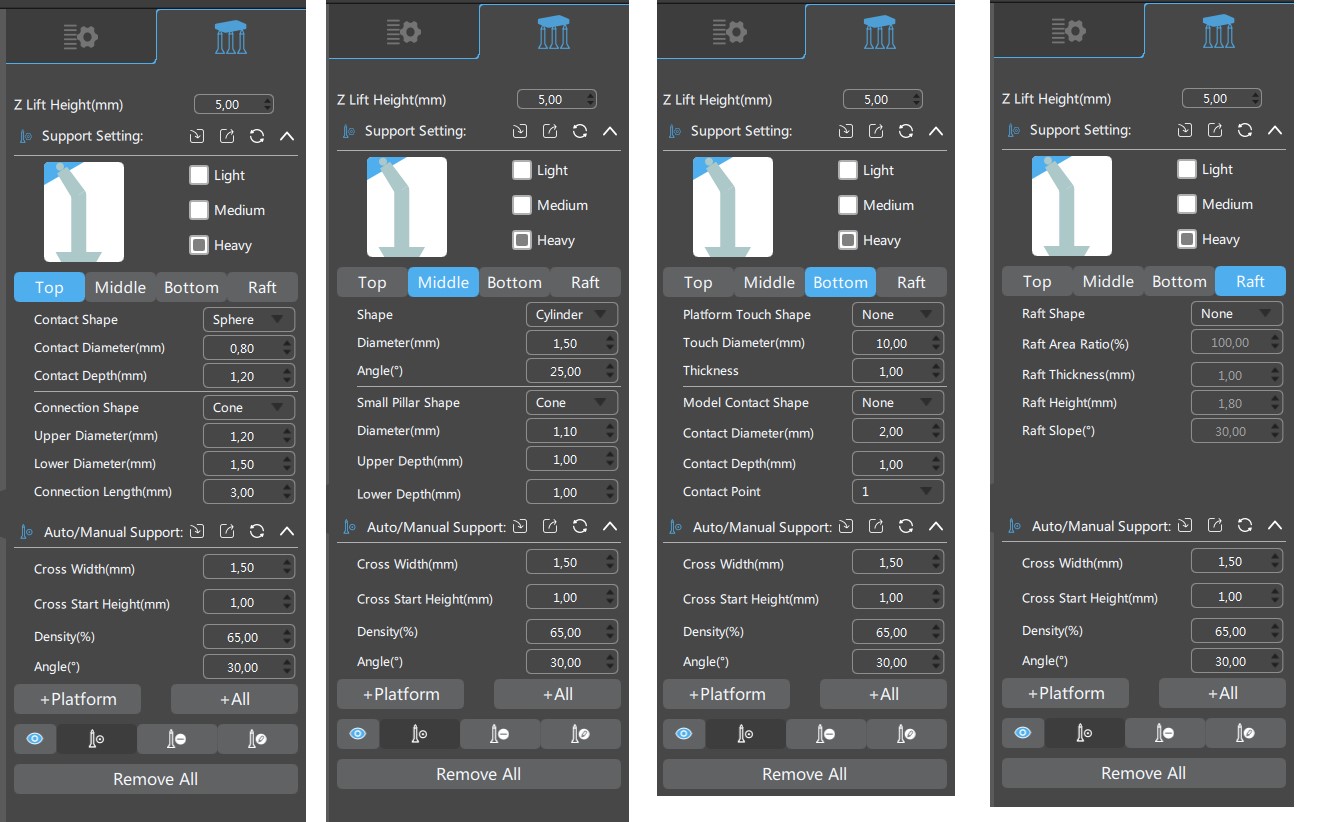
An important factor to get high quality 3D-printing elastomer and rubber parts are the support structures. These supports can vary for each 3D-printer and for each resin. Rigid resins like Deep Blue, Strong-X, Premium White/Black/Model are easy to print with a combination of light and medium supports as shown in Figure 1. A different support strategy works best for printing tough, soft, flexible and elastomer resin. For Tough-X, Flexible-X and Premium Flex, we advise to use use the settings in this article. The settings in this article especially apply to Elastomer-X.
Orientation for 3D-pinting elastic / elastomer resin parts
Just like all other parts, it is important to always support local low points and overhangs for elastomer resin. Big overhangs are difficult to print due to the soft nature of our Liqcreate Elastomer-X resin during 3D-printing. These overhangs can be minimized by smart orientation of the file and placing support structures on the overhangs. If it is possible for your design, then the easiest way to print this material is directly on the build plate. If your part require support, always minimize overhangs and big “flat surfaces”. A flat surface is a surface that is perpendicular to the build plate, as shown in the image below. This is the worst option to support a flexible resin for 3D-printing.
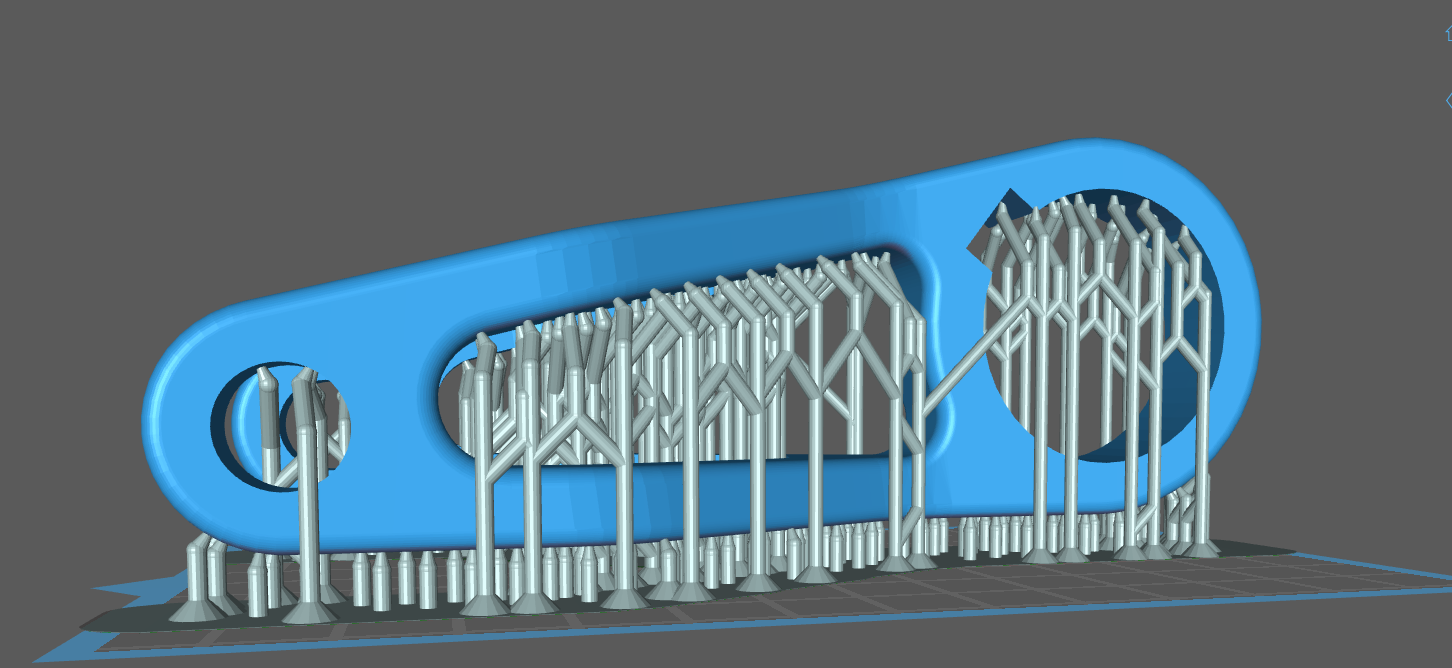
Figure 2: Try to avoid orientations like the image above. Parts with a lot of flat surfaces are difficult for elastomer resin 3D-printing
When supports are required, try to minimize overhangs and flat surfaces as shown in the image below.
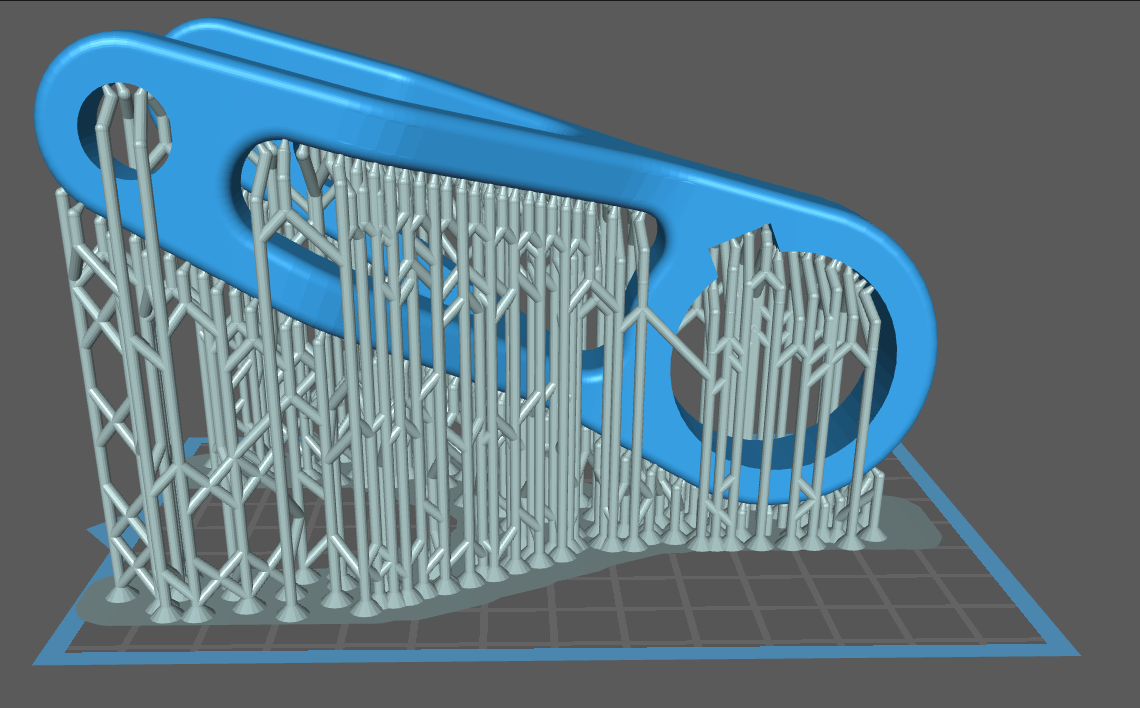
Figure 3: If supports are required, use an angle ~30° to support your elastomer part.
Orientation and preparation of hollow part or areas when 3D-printing with elastomer resin
When printing hollow elastomer parts, or parts with hollow areas like the custom tubing below, it is important to place the part on supports. Opposing of what has been said before. For hollow parts the quality will be worse when 3D-printing directly on the build plate. During the movement of the platform, there is a pressure build-up in the part, giving it extremely bad layer lines and sometimes even cracks within these layer lines, as seen on the left picture below. Placing it on supports will have the same effect as placing a venting hole, to regulate pressure in the part during 3D-printing to finally get a good quality part, as shown in the right part (supports have been removed).
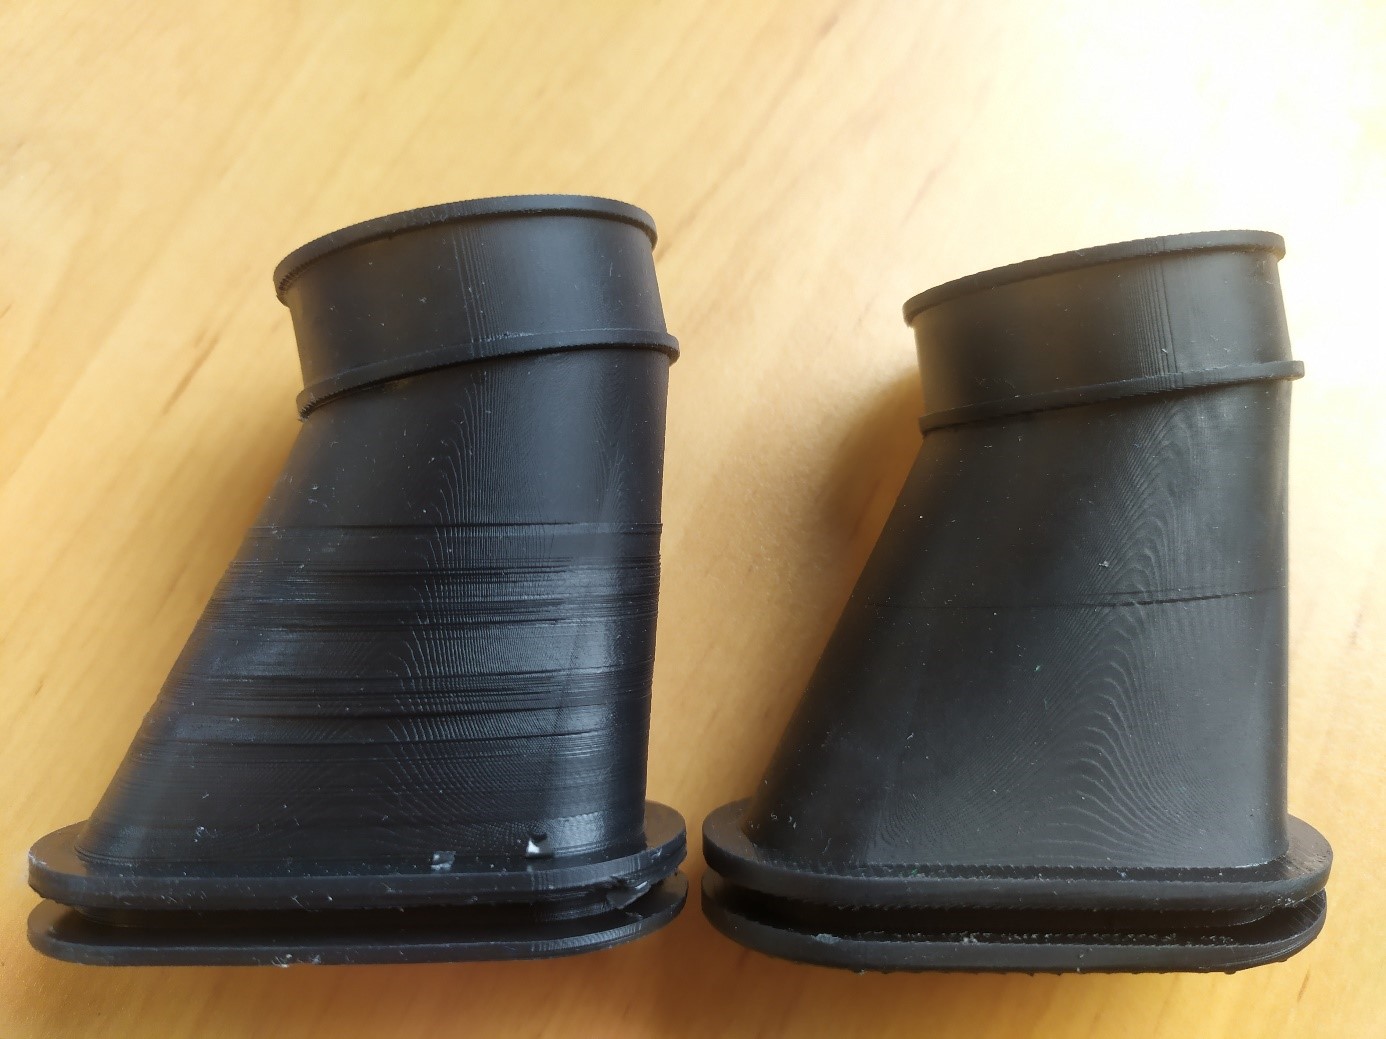
Figure 4: Hollow part without supports on the left and with supports on the right for a rubber-like resin. Supports have the same effect as a venting hole, to regulate pressure in the hollow areas during 3D-printing. This has a positive effect on the part quality and success rate of 3D-printing with elastomer or rubber resin.
Why are elastomer 3D-printed resin parts sometimes sticky?
One of the biggest differences between SLA-based 3D-printing in regard to other 3D-printing technologies is that a chemical reaction has to occur to create a layer. The reaction that occurs is a light induced polymerization of monomers. This specific chemical reaction is a very controlled reaction, leading to the high accuracy of which SLA is known for. However, one of its disadvantages is that the reaction is sensitive to oxygen, which means that an oxygen rich environment may disrupt the reaction.
When too many reactive particles are reacting with oxygen, a half-cured resin will be the end-result leaving a sticky or tacky surface. During a top-down SLA, DLP or MSLA / LCD printing process, the resin is cured on the bottom of the resin tank and there is not enough oxygen present to disrupt the process. However, oxygen is present during post-curing (in air), which will be the main cause of surface stickiness.
Post-processing to get non-sticky elastomer resin parts
Post-processing is an essential step in resin 3D-printing. It is important to post-process 3D-printed parts properly to avoid sticky elastomer 3D-printed parts. There are a few methods to reduce stickiness of a resin 3D-printed part. It is best to follow them all if you are facing issues with sticky elastomer parts. The methods are based on:
- – 3D-print process settings
- – Washing process
- – Post-curing process
- – What not to do?
Resin 3D-Printing process settings
The most important step to reduce sticky surfaces, is to fine-tune your 3D-printing parameters. Check out our list of printers and parameters here. If you are over-curing or under-curing your part, the surface quality is poor and difficult to post-process it into tack-free parts. Under-curing leads to not completely formed layers giving a sticky surface. Over-curing leads to a softer outer surface, which is almost impossible to wash off and will leave a sticky surface. It is therefore important that the exposure, especially for highly opaque materials like Premium White, is spot on. Feel free to contact us at info@liqcreate.com if you are having difficulties in this step, or have any other questions.
Washing process
After getting a high quality resin 3D-printed object, the parts need to be cleaned and post-cured. Washing is an important step. The washing step ensures that all residual unreacted resin is washed off and can’t react with oxygen during post-curing. We advise to wash with IPA, Ethanol (preferably >85%) or the Liqcreate resin cleaner. Resin cleaner instructions can be found here. For Ethanol and IPA it is advisable to use 2 rinsing baths. One with used solvent and one with fresh solvent. Wash the parts preferably ultrasonic, and otherwise under agitation for 2 minutes in the used solution, followed by 3 minutes in the fresh Ethanol/IPA. The second rinse in fresh IPA/Ethanol will make sure no resin is left on the surface.
Resin post-curing process
After a part is washed properly, it should be UV post-cured. But is very important that before post-curing, the part should be completely dry. This can be done by putting it on a bench and wait 30 minutes, by (slightly) heating up the parts or by blowing with compressed air. The dry parts should already feel quite non-sticky and can be post-cured. Read this article to know more about the best UV post-curing parameters of a specific resin.
In the medical field, often a more professional method is used to eliminate oxygen during post processing and thus reduce stickiness of 3D-printed parts. Often the parts are post-cured in a Nitrogen chamber. This will result in completely non-sticky objects. For more difficult processable resins, like our Elastomer-X, we would recommend to post-cure in an oxygen free atmosphere. This would be either in a Nitrogen chamber, or immersed in a transparent jar of water or glycerol during the first minutes of post-curing.
What not to do?
There are a few things that would definitely give sticky parts. The first step not to do is to rinse a part that is not completely clean with water. Water and resin won’t mix and give a dirty, sticky surface. Next to water, post-curing not completely clean or dry parts will also lead to a sticky surface. Once a part is UV Post-cure, it is nearly impossible to get the sticky / tacky surface off. It is therefore advised to give a bit extra focus to the whole process to prevent printing parts again.
Team Liqcreate wish you happy printing. If there are any questions or remarks, feel free to contact us at info@liqcreate.com any time.
Support
Do you need any help with 3D printing our SLA, DLP or LCD resins? We can help you! Just look for the question you have below. If you can’t find it, let us know by contacting us!
Printer Settings →
About Elastomer-X
Liqcreate Elastomer-X is a clear photopolymer resin and can be processed on MSLA (LCD), DLP and laser based 3D-printers. 3D-printed parts from this material are exceptionally soft with a Shore A of 43 and have great flexibility. The product can be used as received, or colored with almost any commercial available 3D-resin colorants. Liqcreate Elastomer-X is can be used on open DLP, LCD and SLA 3D-printers in the range of 385 – 420nm. Its properties simulate soft TPU and silicone which makes it perfect for the production digital lattice foams, soft end of arm tooling (EOAT) for robots, grommets, bellows and elastic industrial parts.
Key benefits |
3D-Printer compatibility |
| · High Elongation | · Shining3D Accufab-L4K |
| · Mimics silicone and soft TPU | · Phrozen & Anycubic series |
| · Low Shore A hardness | · Elegoo & Creality series |
| · Ideal for soft digital lattice foams | · And many more |
