Local US foundry ANAFoundry optimized the casting process for Liqcreate Wax castable resin when casting with bronze. This article is a summary of the workflow optimized by ANAFoundry. Find the extended version in this link.
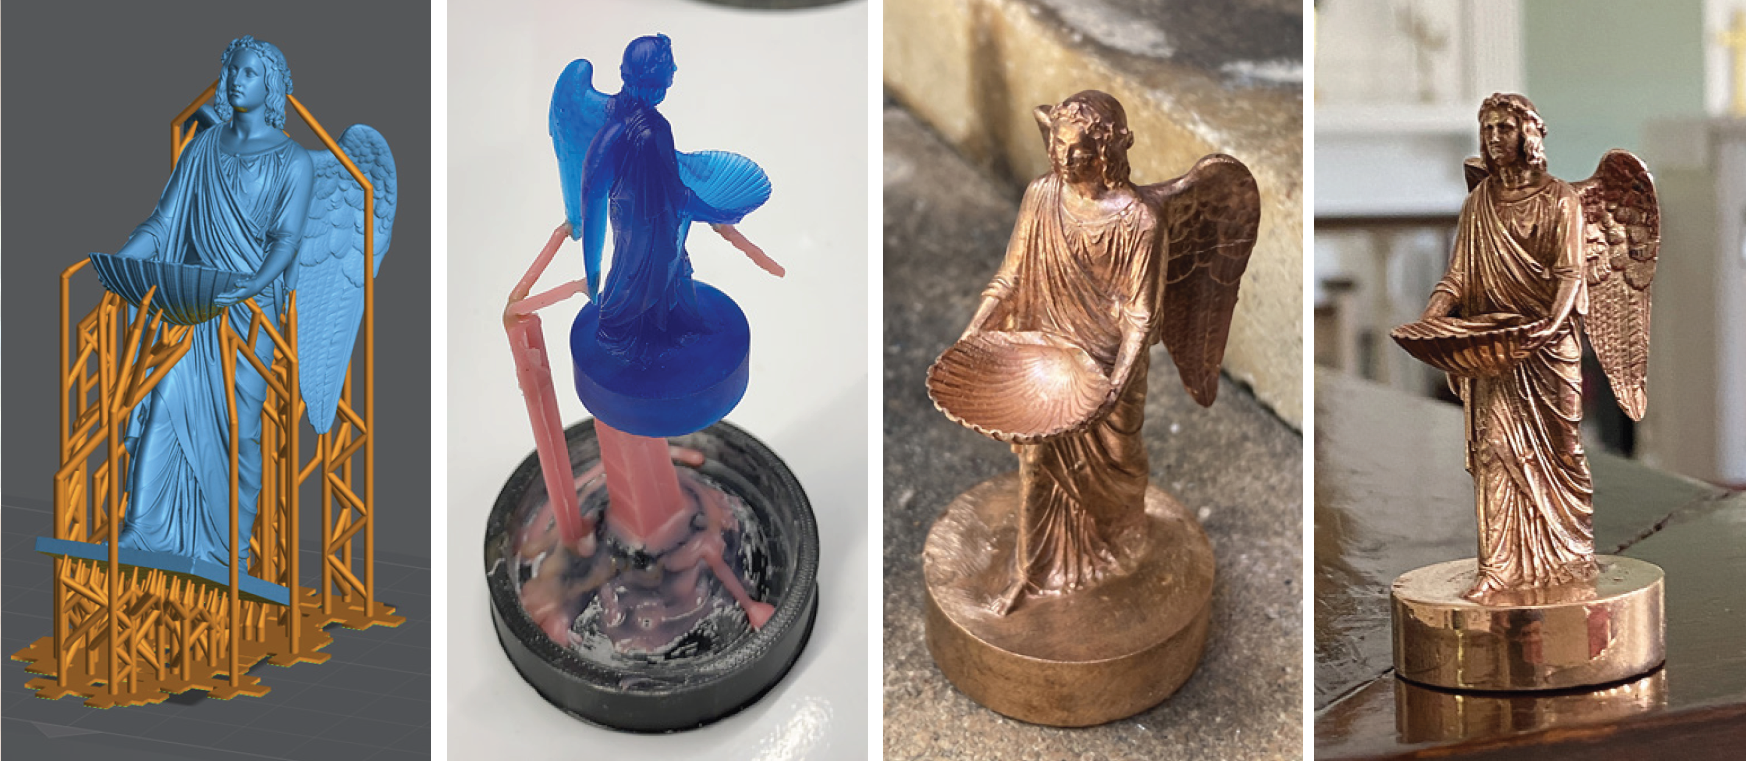 Images of the 3D-printing and casting process from left to right: 1) Model in Lychee Pro with supports. 2) Printed model with Liqcreate Wax Castable resin attached to the wax sprue. 3) Bronze cast, quenched and ready for cleaning. 4) Bronze casting prepared for final polishing.
Validating the casting model printability and dimensions.
The first (optional) step is to validate the design by printing in a basic resin or casting resin. Test if the design is easy to print , the orientation is right to capture all details. Additionally you can measure the dimensions and scale accordingly to prevent that dimensions are off in the final model. After testing switch to printing in Liqcreate Wax Castable resin.
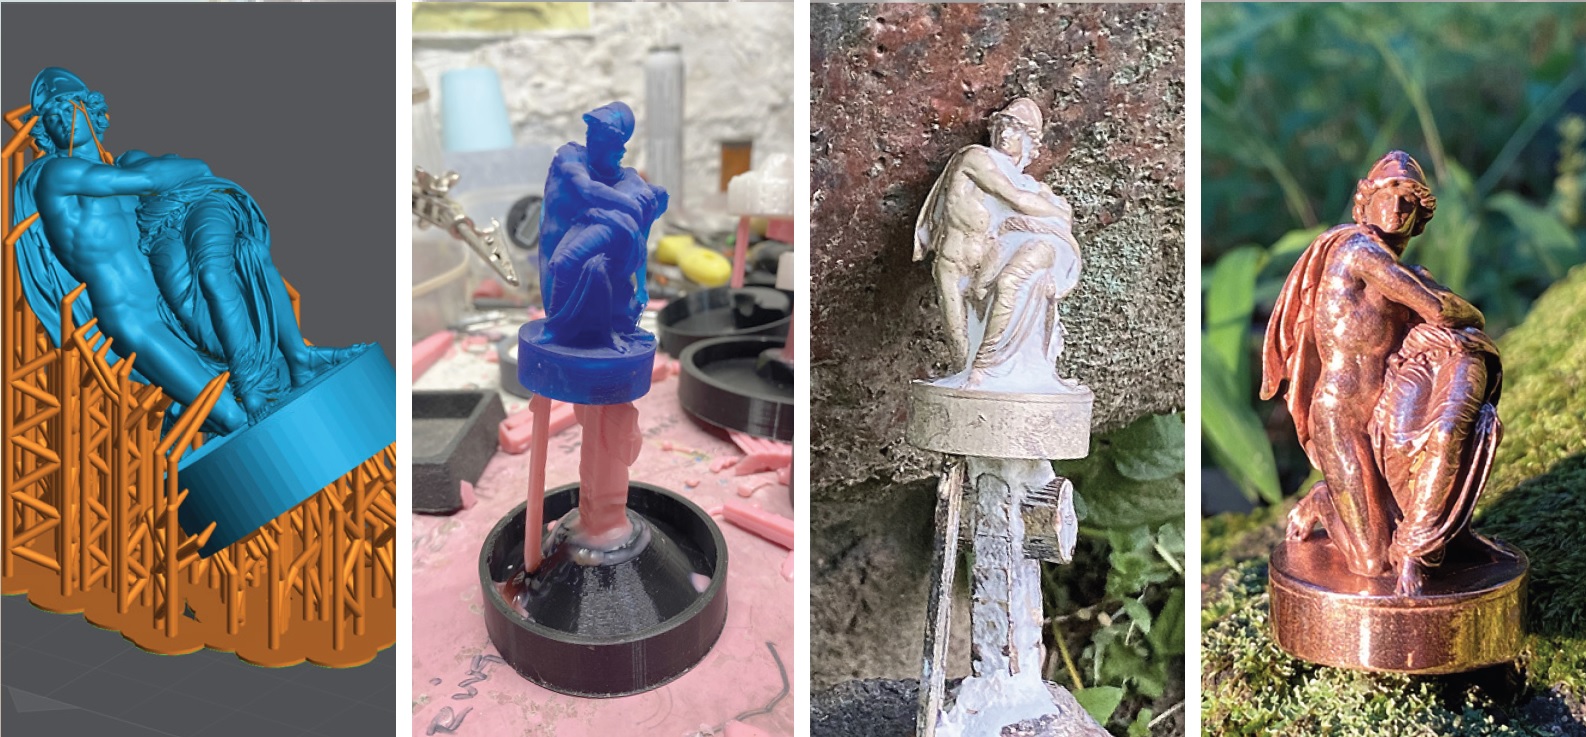 Images of the 3D-printing and casting process from left to right: 1) Casting model in Lychee Pro with supports. 2) Printed model with Liqcreate Wax Castable resin attached to the wax sprue. 3) Bronze cast, quenched and ready for cleaning. 4) Bronze casting prepared for final polishing.
3D-printing of Liqcreate Wax Castable resin
In this link a wide range of 3D-prining settings for Liqcreate Wax Castable and other resins are available. If your printer is not listed, send us an e-mail at info@liqcreate.com and we will help. Usually we can provide basic settings for printers that are not listed. To get it to work in a few test prints while supporting you by e-mail while testing. Additionally, for most models printing in an angle and using medium supports is advised. To safe resin and make it easier to print, hollowing dense parts is advised. Depending on the size of your design, a wall thickness of 3mm on the hollowed part is a good guideline and do not forget to add drain holes closest to the platform as possible. Without drain holes, there can be a pressure build up during printing which results in thick and ugly layer lines in the print.
Washing and curing of 3D-printed Wax Castable parts
Washing and curing of the wax castable parts prior to casting is essential. Using Liqcreate Resin Cleaner or IPA. We often advise to wash in two baths, one with used IPA/Resin Cleaner and the second one with fresh solvent. Start with 2 minutes ultrasonic cleaning or under agitation (like the Formlabs / Anycubic / Elegoo) washing unit. Then place it into the second container with fresh IPA/Resin Cleaner for 2 minutes. Let it dry on the bench for 30 minutes or use compressed air to speed the process. After the IPA is evaporated or the Resin Cleaner is washed off, check if all liquid resin is gone, also in places difficult to reach. If there is still resin present, you can use a soft brush with IPA / Resin cleaner to brush it off and rinse a second time in fresh solvent. This is an important step to make sure the printed part is completely free from liquid resin. After the print is dry, post-cure it for 15 minutes in an UV post-curing unit.
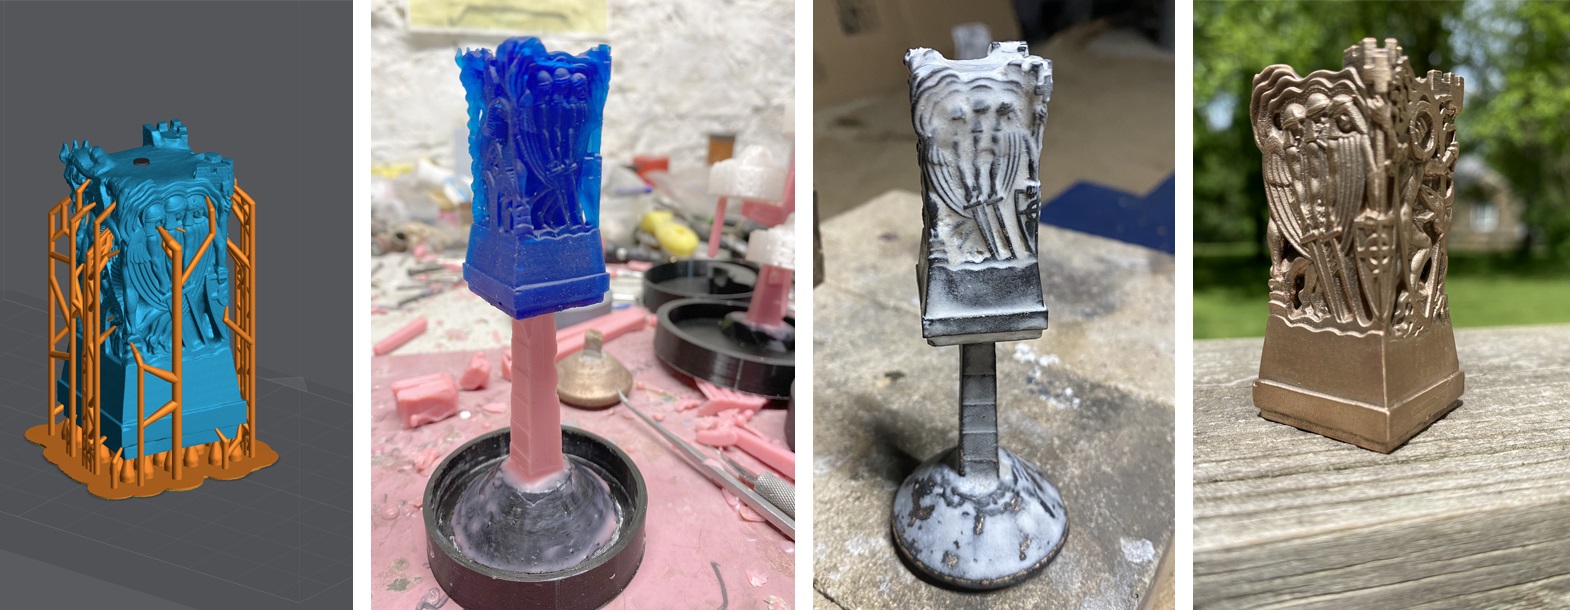 Images of the 3D-printing and casting process from left to right: 1) Casting model in Lychee Pro with supports. 2) Printed model with Liqcreate Wax Castable resin attached to the wax sprue. 3) Bronze cast, quenched and ready for cleaning. 4) Bronze casting prepared for final polishing.
Preparing Liqcreate Wax Castable resin parts for bronze casting
The casting process will copy all details from the printed part in the bronze part. This includes potential surface defects, support marks and also layer or pixel lines in the 3D-printed wax castable part. To minimize work afterwards, it is advised to smooth the printed surface before casting. As smoothing a 3D-printed part is easier compared to smoothening a bronze part. The resin print can be wet sanded or worked with a Dremel tool to achieve the desired finish and remove any undesirable marks. Bill from ANAFoundry often prefers to leave the finish untouched with its satin-like feel. Dimples created from supports should be avoided as much as possible.
The first thing to work on is to determine whether the wax resin piece is printed hollow or was it printed solid. Typically Bill from ANAFoundry prefers some hollowness to relieve any pressure once the plastic starts to swell and expand inside the mold. The pressure continues to build prior to melting and burning out. If the model was printed hollow it will need to have the holes filled to prevent investment from entering the model. The top holes can be filled with general casting wax, while the bottom hole can be filled by attaching the wax sprue to it. This works fast and easy in the process and is ideal to relieve any pressure build-up in the model.
Always follow the instructions for the investment material and weigh the water and investment using a standard gram scale and mix according to the manufacturers recommendations. Because the model can be hollow, the investment can only be degassed once. Pouring the investment into the flask requires a slow and deliberate speed. The investment will trap air and create bubbles if poured too quickly. Hollow models will pull away from the sprue if degassed at this stage. Certus, the manufacturer of Prestige Optima, recommends that the flask should sit for 90-120 min before burn-out. According to Bill, Founder of ANAFoundry
Investment plaster for Bronze casting with Liqcreate Wax Castable
Bill, cofounder at ANAFoundry found Prestige Optima perfect for its higher temperature range and it’s specialized formula for resin printing. Resin needs higher temperatures and create more pressure inside the mold compared to wax. Prestige Optima was designed to handle increased pressure and temperature needed for resin casting. Currently ANAFoundry use only Prestige Optima for all of their bronze casting with Liqcreate Wax Castable resin with good success rate.
The burnout process for casting Liqcreate Wax Castanle resin with bronze
Bill, founder of ANAFoundry explains their casting process: “The burnout process starts with steaming the wax sprue and vents out of the mold. I place the flask in the steamer for an average of 25 min. Steam will remove all of the wax without the smoke and odor associated with starting this process in the burnout oven.”
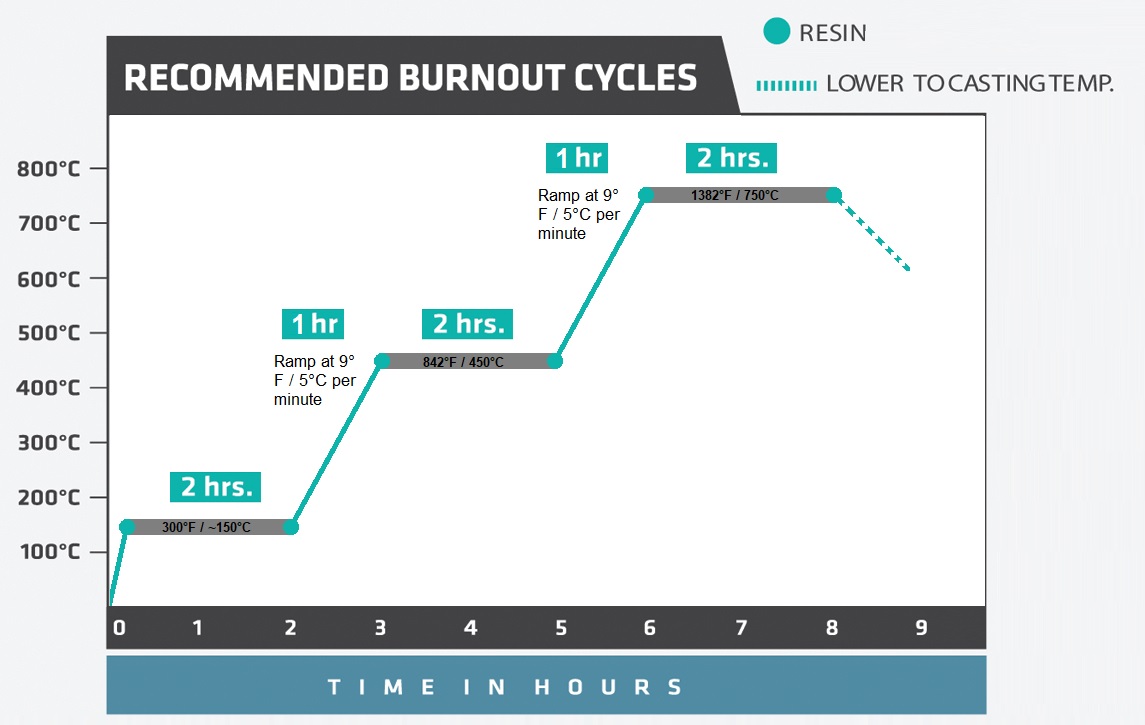
As ANAFoundry uses a smaller flask (2.25” x 6”).they speed-up the burn-out process as shown in the graph above.
Casting bronze with Liqcreate Wax Castable resin
One hour before the burnout schedule is complete ANAFoundry starts gathering foundry tools and the crucible needed. weighing the metal planned to use for the casting and preheat the furnace with the crucible and the metal to about 300°F (~150°C). Once the furnace is above 300°F (~150°C) they close the top and monitor the rise in temperature. When the metal melts and dropped to create a puddle, they will increase the temperature with 100°F-150°F ( ~50°C) above the melting point. They have been using this process for years and it’s pretty reliable. They remove the flask from the burnout oven and place it on the vacuum pad. The flask is rotated to the optimal position to reduce turbulence created from pouring the molten metal. The crucible is carefully positioned over the flask and pouring cup. At this point, the vacuum pump is turned on and the vacuum pressure noted. The rate and speed of the liquid metal entering the flask is steady and uninterrupted. This will reduce any turbulence and air inclusion. Vacuum is only used while pouring. Once the pour cup is just starting to fill with metal, the vacuum is turned off. The casting must sit until the metal begins to solidify then it can be removed from the pad. At this point the casting is complete. Quenching the casting is done when the button is barely seen in a darkly lit area or between 700-800°F (370-430°C).
Finishing bronze casting with Liqcreate Wax Castable resin
Finishing the casted material is depending on the type of metal uses. The same tools can be used that is regularly used for the type of model.
Bill at ANAFoundry explains their process:
1) Use a Double Arrow spot remover water gun to remove any leftover investment on the bronze casting (High Pressure Water-Jet).
2) Continue with a soda blaster to remove some of the oxidation from the casting process.
3) In case of a bronze casting, place the bronze piece into a pickle solution to remove any left-over oxidation.
4) At this stage they will either place in a tumbler with one of several different media (unless it is too delicate). Followed by using an ultrasonic cleaner or use a wire wheel and dremel tool to start the cleanup of the bronze casting.
5) Last stage they are sanding with abrasive pads starting with 180 grit. up to 1800 grit to get a perfect finish.
Liqcreate would like to thank ANAFoundry for for testing & optimizing the bronze casting process with Liqcreate Wax Castable resin. Feel free to reach out to us if you have any questions, comments or need help with using Liqcreate Wax Castable resin!
Support
Do you need any help with 3D printing our SLA, DLP or LCD resins? We can help you! Just look for the question you have below. If you can’t find it, let us know by contacting us!
Printer Settings →
About Liqcreate Wax Castable
Liqcreate Wax Castable is a wax-based resin, perfect for manufacturing jewelry, dental and industrial parts using the direct investment casting method. Liqcreate Wax Castable is easy to use on open LCD, MSLA and DLP based 3D-printers in the range of 385 – 420nm. 3D-printed parts from this material captures intricate features and show crisp details. This wax-based material offers smooth surfaces with clean burnout for a reliable casting process. Create custom made elegant organic geometries according to your preferences with excellent casting for positive and negative engravings.
Key benefits |
3D-Printer compatibility |
| · High precision | · Asiga Max and Pro 4K |
| · Wax based | · Phrozen3D series |
| · Clean & ash-free burnout | · Elegoo & Anycubic series |
| · Excellent casting of engravings | · And many more |
